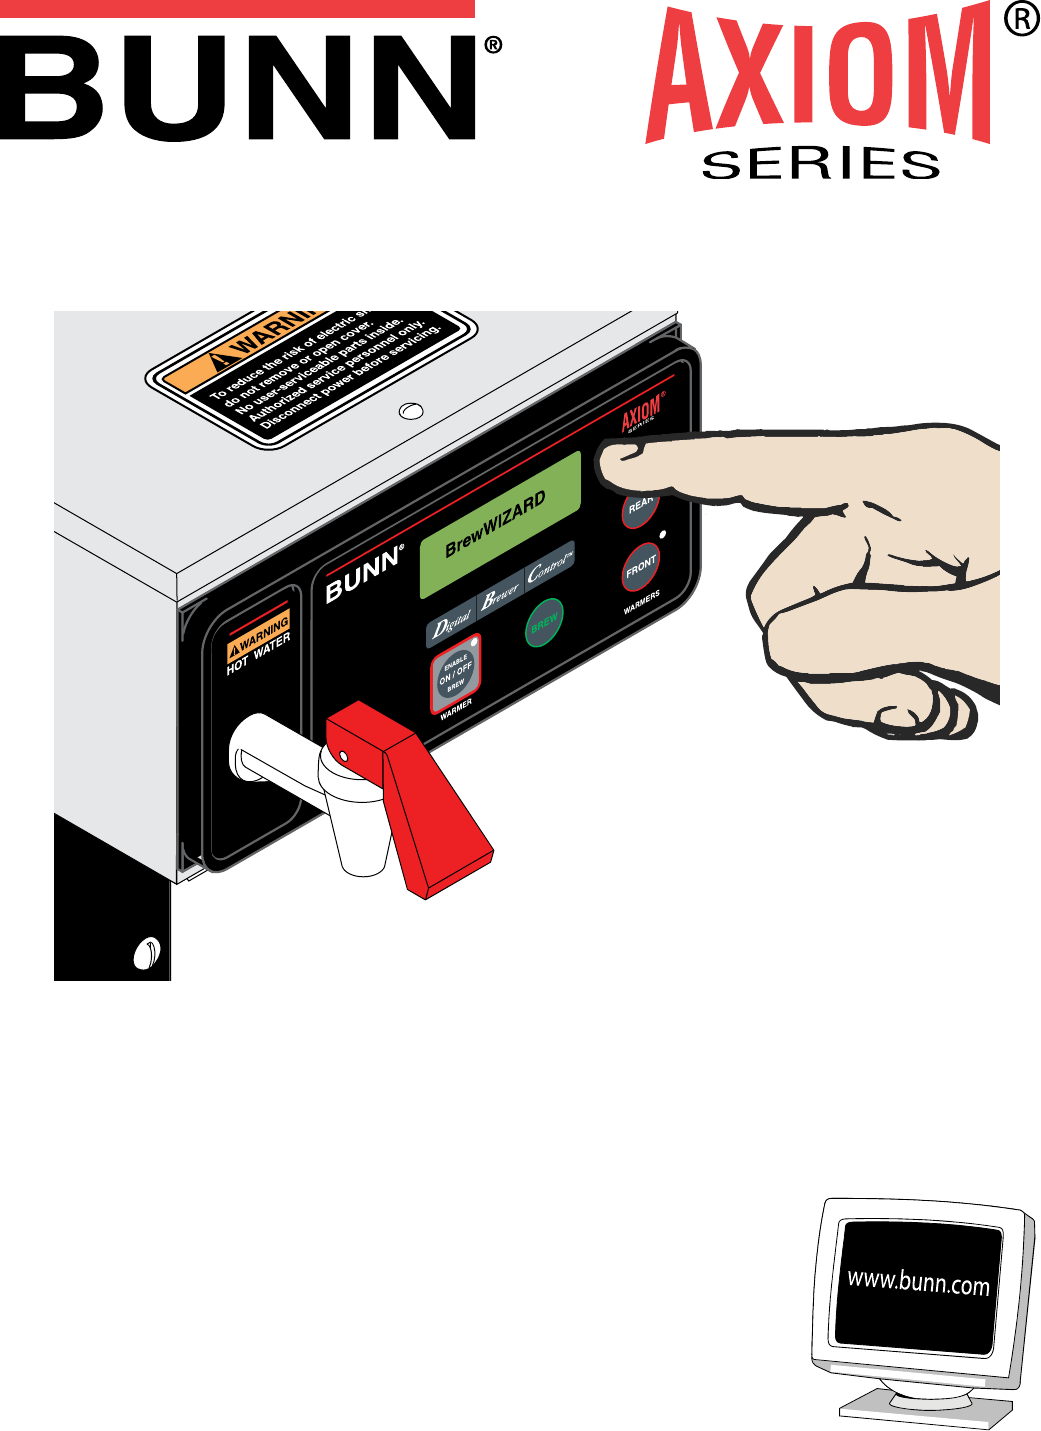
PROGRAMMING MANUAL
BUNN-O-MATIC CORPORATION
POST OFFICE BOX 3227
SPRINGFIELD, ILLINOIS 62708-3227
PHONE: (217) 529-6601 FAX: (217) 529-6644
41154.0000C 05/12 ©2008 Bunn-O-Matic Corporation
Page 2
41154 030912
BUNN-O-MATIC COMMERCIAL PRODUCT WARRANTY
Bunn-O-Matic Corp. (“BUNN”) warrants equipment manufactured by it as follows:
1) Airpots, thermal carafes, decanters, GPR servers, iced tea/coffee dispensers, MCP/MCA pod brewers thermal servers
and Thermofresh servers (mechanical and digital)- 1 year parts and 1 year labor.
2) All other equipment – 2 years parts and 1 year labor plus added warranties as specified below:
a) Electronic circuit and/or control boards – parts and labor for 3 years.
b) Compressors on refrigeration equipment – 5 years parts and 1 year labor.
c) Grinding burrs on coffee grinding equipment to grind coffee to meet original factory screen sieve analysis – parts
and labor for 4 years or 40,000 pounds of coffee, whichever comes first.
These warranty periods run from the date of installation BUNN warrants that the equipment manufactured by it will be
commercially free of defects in material and workmanship existing at the time of manufacture and appearing within the
applicable warranty period. This warranty does not apply to any equipment, component or part that was not manufactured
by BUNN or that, in BUNN’s judgment, has been affected by misuse, neglect, alteration, improper installation or operation,
improper maintenance or repair, non periodic cleaning and descaling, equipment failures related to poor water quality,
damage or casualty. In addition, the warranty does not apply to replacement of items subject to normal use including but
not limited to user replaceable parts such as seals and gaskets. This warranty is conditioned on the Buyer 1) giving BUNN
prompt notice of any claim to be made under this warranty by telephone at (217) 529-6601 or by writing to Post Office
Box 3227, Springfield, Illinois 62708-3227; 2) if requested by BUNN, shipping the defective equipment prepaid to an
authorized BUNN service location; and 3) receiving prior authorization from BUNN that the defective equipment is under
warranty.
THE FOREGOING WARRANTY IS EXCLUSIVE AND IS IN LIEU OF ANY OTHER WARRANTY, WRITTEN OR ORAL, EX–
PRESS OR IMPLIED, INCLUDING, BUT NOT LIMITED TO, ANY IMPLIED WARRANTY OF EITHER MERCHANTABILITY
OR FITNESS FOR A PARTICULAR PURPOSE. The agents, dealers or employees of BUNN are not authorized to make
modifications to this warranty or to make additional warranties that are binding on BUNN. Accordingly, statements by such
individuals, whether oral or written, do not constitute warranties and should not be relied upon.
If BUNN determines in its sole discretion that the equipment does not conform to the warranty, BUNN, at its exclusive op–
tion while the equipment is under warranty, shall either 1) provide at no charge replacement parts and/or labor (during the
applicable parts and labor warranty periods specified above) to repair the defective components, provided that this repair
is done by a BUNN Authorized Service Representative; or 2) shall replace the equipment or refund the purchase price for
the equipment.
THE BUYER’S REMEDY AGAINST BUNN FOR THE BREACH OF ANY OBLIGATION ARISING OUT OF THE SALE OF THIS
EQUIPMENT, WHETHER DERIVED FROM WARRANTY OR OTHERWISE, SHALL BE LIMITED, AT BUNN’S SOLE OPTION
AS SPECIFIED HEREIN, TO REPAIR, REPLACEMENT OR REFUND.
In no event shall BUNN be liable for any other damage or loss, including, but not limited to, lost profits, lost sales, loss of
use of equipment, claims of Buyer’s customers, cost of capital, cost of down time, cost of substitute equipment, facilities
or services, or any other special, incidental or consequential damages.
392, AutoPOD, AXIOM, BrewLOGIC, BrewMETER, Brew Better Not Bitter, BrewWISE, BrewWIZARD, BUNN Espress, BUNN
Family Gourmet, BUNN Gourmet, BUNN Pour-O-Matic, BUNN, BUNN with the stylized red line, BUNNlink, Bunn-OMatic,
Bunn-O-Matic, BUNNserve, BUNNSERVE with the stylized wrench design, Cool Froth, DBC, Dr. Brew stylized Dr. design,
Dual, Easy Pour, EasyClear, EasyGard, FlavorGard, Gourmet Ice, Gourmet Juice, High Intensity, iMIX, Infusion Series, In–
tellisteam, My Café, Phase Brew, PowerLogic, Quality Beverage Equipment Worldwide, Respect Earth, Respect Earth with
the stylized leaf and coffee cherry design, Safety-Fresh, savemycoffee.com, Scale-Pro, Silver Series, Single, Smart Funnel,
Smart Hopper, SmartWAVE, Soft Heat, SplashGard, The Mark of Quality in Beverage Equipment Worldwide, ThermoFresh,
Titan, trifecta, Velocity Brew, A Partner You Can Count On, Air Brew, Air Infusion, Beverage Bar Creator, Beverage Profit
Calculator, Brew better, not bitter., BUNNSource, Coffee At Its Best, Cyclonic Heating System, Daypart, Digital Brewer
Control, Nothing Brews Like a BUNN, Pouring Profits, Signature Series, Tea At Its Best, The Horizontal Red Line, Ultra are
either trademarks or registered trademarks of Bunn-O-Matic Corporation.
Page 3
41154 041708
INTRODUCTION
This equipment will brew a
1
⁄2 gallon batch of coffee into an awaiting decanter. The brewer may have
a hot water faucet for allied beverage use. It is only for indoor use on a sturdy counter or shelf.
CONTENTS
Adjustments & Programming ………………………………………………………. 4
Troubleshooting ……………………………………………………………………….. 14
Page 4
ADJUSTMENTS & PROGRAMMING
MAIN SCREEN
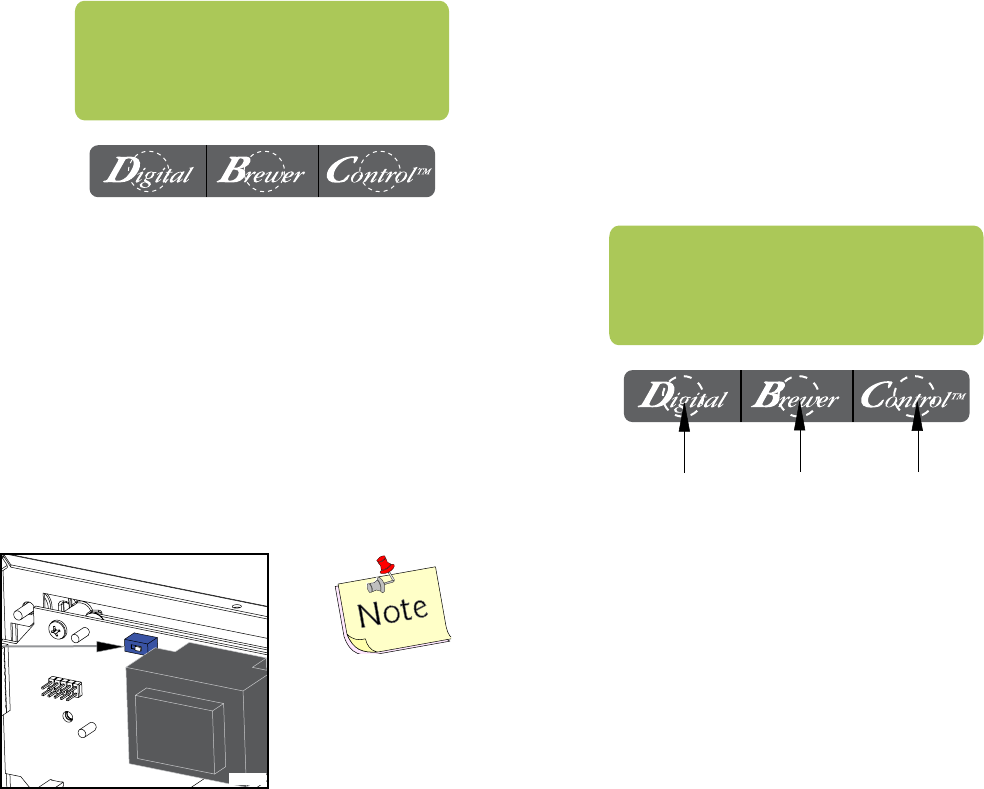
BREW LOCKOUT
This function allows the operator to prevent
or allow brewing if the water temperature is less
than the set READY temperature.
To access this function screen press and hold
the right hidden switch. Release when the display
reads: “BREW WIZARD” it will then read:
Press here
for NO
Press here
for DONE
Press here
for YES
PROGRAM FUNCTIONS – BREW WIZARD
PROGRAMMING THE BREWER
The programming of the brewer is divided into two levels. Brewing adjustments are in “BrewWiz–
ard”. Service functions are accessed in Level 2.
The following function screens are in order of appearance. Each screen will have instructions on
how to access, and the procedures to program the various functions of the brewer.
IMPORTANT PROGRAMMING NOTES
– READ CAREFULLY –
To exit the programming mode at any time, press and release “ENABLE BREW ON/OFF” switch
located on the front switch panel. The display will return to the MAIN SCREEN.
If none of the five programming switches are pressed within one minute during the setup of the
brewer, the programming of the function screen that is being set will be exited and the display will
return to the MAIN SCREEN.
Always remember to place an empty server and funnel under the sprayhead when operating the
brewer during the set-up of PULSE BREW, CALIBRATE FLOW and testing the brew valve in SER–
VICE TOOLS/TEST OUTPUTS.
BREW LOCKOUT?
NO DONE YES
READY TO BREW
WATER TEMP: 200°
PROGRAMMING LOCKOUT SWITCH
(Mounted on main control board)
This switch can be set to prevent access to the
programming settings of the brewer. Once all
the correct brew settings are programmed, the
operator can set the switch to the “ON” position to
prohibit anyone from changing the settings. With
the switch in the “ON” position, the programming
menus can still be accessed to view the current
settings. However, no changes will be saved.
The YES or NO should be flashing. Select YES
to prevent brewing if the water temperature is
below the set READY temperature. Select NO
to permit brewing at any water temperature.
When finished, press and release DONE. This
will step to the next function screen. To return
to the MAIN SCREEN at any time, press and
release “ENABLE BREW ON/OFF”.
Disconnect brewer from
power source before
removing any panel!
P3634
41154 041708
Page 5
– +
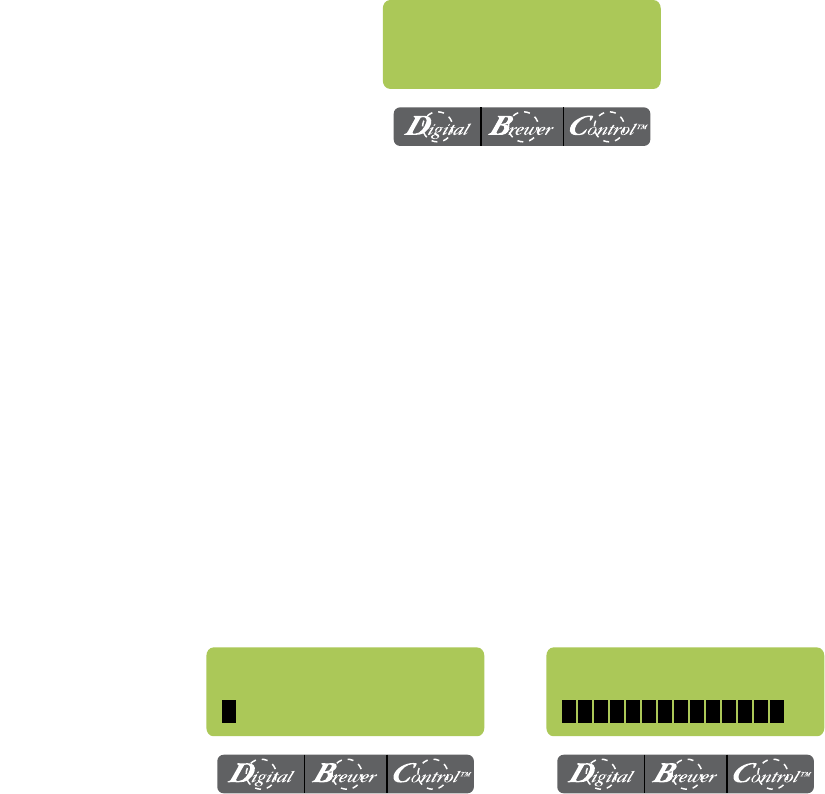
This function allows the operator to adjust the brew volume.
Procedure:
1. Press and hold the right hidden switch until the display reads “BrewWIZARD” and release.
2. The display will then read: “BREW OZ: xx.x”
3. Press (-) “Digital” to decrease the amount, or (+) “Control” to increase.
Range: (10 to 192 oz., in .5 oz. increments) or (.30 to 6.60 Liters, in .01 increments)
4. When finished, press “DONE”. This will take you to the next screen. Press and release the right
hidden switch to continue to the next screen, or press and release the “ENABLE BREW ON/OFF”
switch to return to the main screen.
The functions in the “BrewWIZARD” allow the operator to adjust brew settings and other features.
PROGRAMMING FUNCTIONS – BrewWIZARD (cont.)
BREW OZ:
ADJUSTMENTS & OPTIONAL SETTINGS (CONT.)
This function allows the operator to adjust the brew strength/extraction time. Setting #1 will produce
a non-pulsed brew cycle and the highest (#14) will give you the longest time (utilizing pulse brew).
Procedure:
1. Press and hold the right hidden switch until the display reads “BrewWIZARD” and release.
2. The display will then read: “BREW OZ: xx.x”
3. Press and release the right hidden switch until the display reads “BREW METER”
4. Press (-) to decrease the amount, or (+) to increase. (Range: 1 – 14)
5. When finished, press and release the right hidden switch. This will take you to the next screen,
or press and release the “ENABLE BREW ON/OFF” switch to return to the main screen.
BREW METER:
BREW METER 1
BREW METER 14
– +
NOTE: This will overwrite settings in “PULSE BREW”
Weakest (Shortest) Strongest (Longest)
BREW OZ: 64.0
(-) DONE (+)
41154 041708

Page 6
ADJUSTMENTS & OPTIONAL SETTINGS (CONT.)
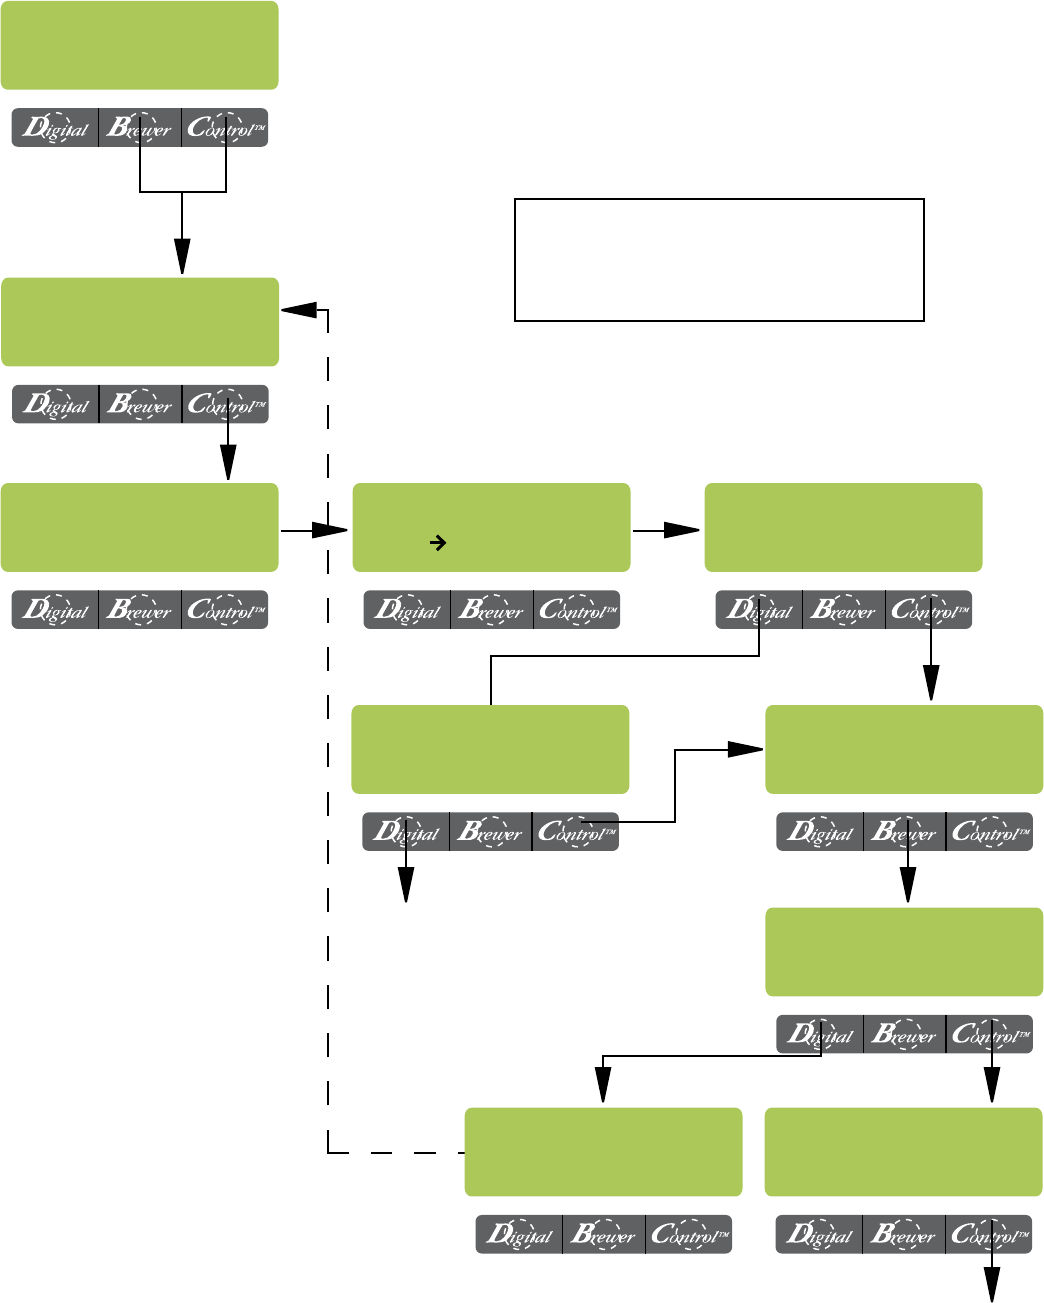
ENABLE ADS
This function allows the operator to choose wheth–
er or not to display an advertising message. An
ad can be saved to the brewer by writing the ad
using the programming commands. This message
will be displayed when the brewer is idle.
Procedure to Enable/Disable Ads:
1. Press and hold the right hidden switch until
the display reads “BrewWIZARD” then release.
Press and release the right hidden switch until
the display reads “ENABLE ADS ?”. The “YES”
or “NO” will be flashing to indicate the current
selection.
2. Press and release the “NO” switch to disable
this function, or:
3. Press and release the “YES” switch to enable
this function.
4. When finished, press and release “DONE” to
save the new setting and advance to the next
function screen.
5. If “NO” was selected, the display should now
read “ENTER SERVICE #?”. To exit program–
ming and return to the MAIN SCREEN, press
and release the “ENABLE BREW ON/OFF”
switch.
6. If “YES” was selected, the display should now
read “NEW AD?”. This screen allows you to
write a new ad.
7. The display should now read “2 LINES 16
CHARS AVAILABLE”, and then “SCROL
THRU ALPHA, NEXT -> NEXT LETTER”, and
then “WRITE TOP LINE?”. The ad can be up
to 32 characters long, 16 per line. The ad will
be written in two steps, first the top line, then
the bottom line.
9. To write the top line of a new ad, press and
release “YES”. To skip the top line and only
write a bottom line, press and release “NO”
and proceed to step 13. To exit program–
ming and return to the MAIN SCREEN, press
and release the “ENABLE BREW ON/OFF”
switch.
10. The display will now read “A” with a flashing
cursor below it. Press and hold the “SCROLL”
switch to scroll through the alphabet and avail–
able characters. When the desired character
is shown on the display, press and release
“NEXT” to move to the next character in the
top line.
11. Repeat step 10 until the top line is com–
plete.
12. Press and release “DONE”. The display should
now read “WRITE BTM LINE?”.
13. To write the bottom line of the new ad, press
and release “YES”.
14. To skip the bottom line, press and release
“NO”.
a. If neither a top nor bottom line was writ–
ten, the display should now read “ENTER
SERVICE #?”.
b. If only a top line was written, the ad will
be displayed followed by “SAVE?” Proceed to
step 18.
15. The display will now read A with a flashing
cursor below it. Press and hold the “SCROLL”
switch to scroll through the alphabet and avail–
able characters. When the desired character
is shown on the display, press and release
“NEXT” to move to the next character in the
bottom line.
16. Repeat step 15 until the bottom line is com–
plete.
17. Press and release “DONE”. The display will
now show the written ad, and then “SAVE?”
18. To cancel saving the ad, press and release
“NO”. The display should now read “ADVER–
TISEMENT NOT SAVED!” and then will return
to the “NEW AD” screen. To exit program–
ming and return to the MAIN SCREEN, press
and release the “ENABLE BREW ON/OFF”
switch.
19. To correct or edit the ad, press and release
“EDIT”. The display should now read “WRITE
TOP LINE?” Repeat steps 10 though 17.
20. To save the ad as it is shown, press and re–
lease “YES”. The display should now read
“ADVERTISEMENT SETUP COMPLETE”,
and then “ENTER SERVICE #?”. To exit pro–
gramming and return to the MAIN SCREEN,
press and release the “ENABLE BREW ON/
OFF” switch.
41154 041708
Page 7
NEW AD ?
NO YES
WRITE TOP LINE ?
NO YES
2 LINES 16 CHARS
AVAILABLE
ENABLE ADS ?
NO DONE YES
SCROL THRU ALPHA
NEXT NEXT LETTER
A
SCROLL DONE NEXT
WRITE BTM LINE ?
NO YES
SAVE ?
NO EDIT YES
ADVERTISEMENT
SETUP COMPLETE
ADJUSTMENTS & OPTIONAL SETTINGS (CONT.)
ENTER SERVICE #?
ENTER SERVICE #?
ADVERTISEMENT
NOT SAVED !
NOTE: The available characters are:
A through Z
0 through 9
! ” # $ % & ‘ ( ) * + , – . / : ; < = > ? @
41154 041708
Page 8
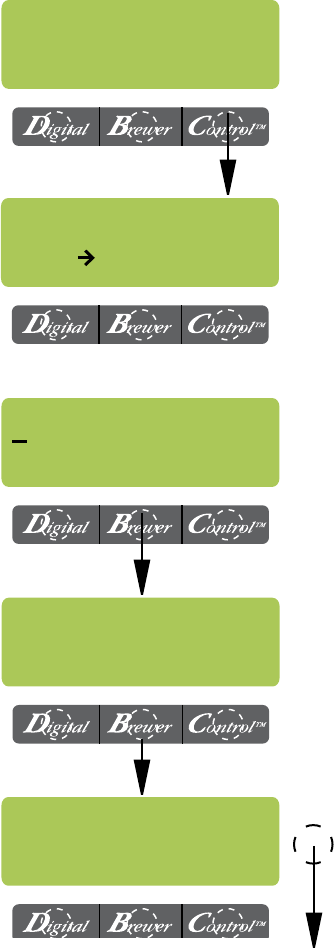
SERVICE NUMBER
This function allows the operator to enter in the
telephone number to call if service is needed. The
service number will be displayed anytime there
is a fault message displayed.
Procedure to enter the service number:
1. Press and hold the right hidden switch until
the display reads “BrewWIZARD” then release.
Press and release the right hidden switch until
the display reads: “ENTER SERVICE #?”
2. Press and release “YES” switch. The display
will now read “SCROL THRU #’S NEXT – >
NEXT NUMBER”, followed by “SCROLL
DONE NEXT”.
3. Press the “SCROLL” switch to increment the
number. When the desired number is shown,
press and release the “NEXT” switch to move
to the next digit in the phone number.
4. Repeat Step 3 until the entire number is en–
tered.
5. Press and release the “DONE” switch. The
display will now read “EXITING BrewWIZARD”
and then “ENTER PASSWORD”.
ENTER PASSWORD
This function allows the operator to enter a 3
digit number to access LEVEL 2. If no number
has been pre programmed (0 0 0), then access
is allowed by pressing and releasing the right
hidden switch.
Procedure to enter the “PASSWORD”:
1. Press and release the “Digital” switch to in–
crement the first digit.
2. Press and release the “Brewer” switch to
increment the second digit.
3. Press and release the “Control” switch to
increment the third digit.
4. Press and release the right hidden switch. If
the correct password was entered, the display
will now read “SET PASSWORD”. If the wrong
password was entered, the unit will revert back
to the main screen.
ADJUSTMENTS & OPTIONAL SETTINGS (CONT.)
ENTER SERVICE #?
NO YES
EXITING
BrewWIZARD
SCROL THRU #’s
NEXT NEXT NUMBER
SCROLL DONE NEXT
PROGRAMMING FUNCTIONS – LEVEL 2
ENTER PASSWORD
0 0 0
41154 041708

Page 9
NOTE: Access to the remaining functions in LEVEL 2 is intended for trained service personnel only.
More in depth information can be found in the Axiom Service Manual 39132.0000
PROGRAMMING FUNCTIONS – LEVEL 2 (cont.)
ENTER ASSET # ?
NO YES
SET READY: 195°
(-) DONE (+)
SET TEMP: 200°
(-) DONE (+)
UNITS
METRIC DONE ENG
SET LANGUAGE
NO YES
SET PASSWORD
0 0 0
ADJUSTMENTS & OPTIONAL SETTINGS (CONT.)
Any 3 digit number may be programmed to prevent unauthor–
ized access of LEVEL 2. BE CAREFUL TO USE A CODE YOU WILL
REMEMBER!
Choose between English or Spanish. After selecting “YES”,
press either ( + ) or ( – ) to select, then choose “YES” again
when asked, “ARE YOU SURE?”
Choose between English or Metric units. Display will read:
“CHANGING UNITS WILL CAUSE” “ALL SETUP INFO TO BE
LOST” “ARE YOU SURE?” “NO YES”. NOTE: If the brewer
is set for Metric Units, displays will be different. (ex: Brew oz
will become Brew Liters, ° F will be ° C).
Adjusts brew tank temperature.
RANGE: (185 to 205° F) or (85 to 96° C)
This function sets the minimum temperature allowable to start
a brew cycle. Range: (2° to 20° F) or (2° to 10° C) below the set
temperature. The water must be at the “READY” temperature
or higher for the display to indicate “READY TO BREW”.
This function allows the you to enter in an optional asset num–
ber. This can be useful for tracking the usage or service of an
individual machine within a group.
41154 041708
Page 10
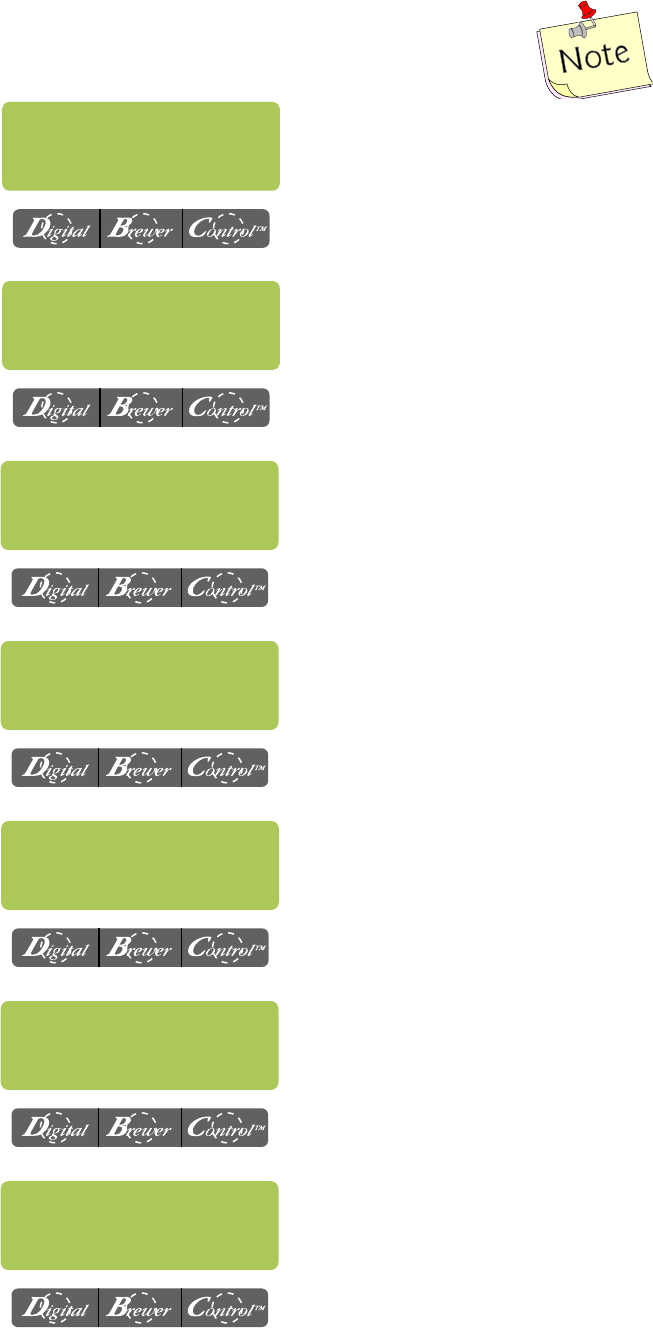
“EASY PULSE BREW” times:
Min: Base brew time + 40 seconds
Max: Base brew time + 3:00 minutes
DRIP TIME 0:30
(-) DONE (+)
0 REFILL 155
(-) DONE (+)
ENABLE CLEAN
NO DONE YES
SET PULSE BREW ?
NO YES
PROGRAMMING FUNCTIONS – LEVEL 2 (cont.)
ADJUSTMENTS & OPTIONAL SETTINGS (CONT.)
This function allows the sprayhead to “pulse” on and off dur–
ing a brew cycle. These times can be set two different ways.
The first is by setting the total brew time in the “EASY PULSE
BREW” screen. The other option allows the actual times to be
entered in the “MANUAL PULSE BREW” screen.
Adjusts the DRIP TIME (time from end of sprayhead flow to
when liquid stops dripping from the funnel). When the brew
cycle is complete, the display will show “DRIPPING” and will
countdown the time until the funnel empties.
RANGE: “OFF” or 0:05 to 4:00 minutes
Set the time before a cleaning alert will be displayed.
RANGE: 1 to 30 days
Enables the mode function and sets the idle time. Then choose
to have the tank heater(s) turn off, or reduce the tank temp to
(140° F) or (60° C) once the set idle time has expired.
Range: 0.5 to 24.0 hrs
Enables the “FRESHNESS ALERT!” message and sets the
expiration time. The expiration time is the amount of time the
product is allowed to sit in the server before an alert message
is displayed.
Range: 0.5 to 4.0 hrs
Adjusts the sensitivity of the refill circuit. Water in different
geographical locations can have different conductivities. Make
sure the water in the tank is touching the refill probe. NOTE:
Always make sure that the # on the right is larger than the #
on the left when water is contacting the tank refill probe.
NOTE: This will overwrite settings in “BREW METER”.
Sets the amount of time a warmer will remain on after being
turned on. Each warmer has an independent timer and is af–
fected by its corresponding switch. NOTE: The lower “Brew”
warmer timer is restarted when brew switch is pressed. Range:
15mins to 6.0 hrs in 15 min increments.
Enabl EnergySavr
NO DONE YES
ENABL WARMER OFF
NO DONE YES
EnableFreshTimer
NO DONE YES
41154 041708

Page 11
TOO HOT-WILL
COOL TANK NOW
ACCURACY RISK!!!
OK CAL.
CALIBRATE NOW?
NO YES
PLACE BREWER IN
FINAL LOCATION
ENABLE BrewLOGIC
NO DONE YES
PROGRAMMING FUNCTIONS – LEVEL 2 (cont.)
ADJUSTMENTS & OPTIONAL SETTINGS (CONT.)
The BrewLogic system allows the brewer to be calibrated to
high mineral locations and compensate as deposits build up
internally. Press YES, then press DONE. Follow the prompts.
Pertains only to software version 1.07 & above!
Select a sturdy, level location.
Brewer must not be bumped during calibration!
Select YES for calibration. Selecting NO warns of accuracy
risk
Select CAL. to start calibration procedure. Selecting OK will
skip to level probe calibration screen.
Automatically checks to see if tank temperature is between
130°-170°F (54°-76°C)
Go to
SPRAY OZ/M:
Go to CAL
LP1-LP2
PRESS BREW WHEN
CONTAINER READY
Verify brew funnel and decanter/airpot/thermal server (depend–
ing on which model you have) are in place. Then press the
“BREW START” button.
COOLING TANK
PLEASE WAIT
Message will be displayed while dispense is being performed.
Tank heaters are turned off and the unit will dispense for ~1
minute to cool tank temperature.
(CONT.)
41154 041708

Page 12
SPRAY OZ/M: XX.X
LP1-LP2 OZ XX.X
ENTER OZ XX.X
(-) DONE (+)
WaitingTilCycle 4
CYCLE x COMPLETE
CALIBRATE SPRAY
PRESS BREW START
CONTAINER READY?
QUIT YES
PROGRAMMING FUNCTIONS – LEVEL 2 (cont.)
When the dispensing finishes, empty the decanter/server and
place back under brew funnel.
Select YES for calibration. Selecting QUIT will skip to level
probe calibration screen.
Press the “BREW START” button. Will perform the sprayhead
flow-rate calibration as well as the level probe calibration.
Brewer must not be bumped during calibration!
Machine will dispense volume between upper probe and
lower probe 4 times. (The total dispense will be about half of
a decanter)
Brewer must not be bumped during calibration!
Enter volume dispensed into container.
Use the (+) to increase the numeric value or (-) to decrease.
Displays sprayhead flow-rate and volume of water between
the upper and lower level probes.
Go to CAL
LP1-LP2
CALIBRATE LP1-LP2
NO YES
Allows you to perform calibration again if you want to verify
results.
Go to BREW
COUNTERS
Go to CAL
LP1-LP2
41154 041708

Page 13
FACTORY DEFAULTS
NO YES
SERVICE TOOLS ?
NO YES
BREW COUNTERS ?
NO YES
CALIBRATE FLOW ?
NO YES
SPRAY OZ/M: 25.0
(-) DONE (+)
PROGRAMMING FUNCTIONS – LEVEL 2 (cont.)
View or enter the actual flow rate coming out of the sprayhead.
This is used to tell the internal controller how fast the water
is flowing. Use the “CALIBRATE FLOW” screen to obtain the
most current flow rate.
Range: (3.0 to 75.0 oz) or (100 to 2200ml)
This function provides a 60 second test mode to capture
water from the sprayhead. This measurement will then give
you the numbers to enter into the “SPRAY OZ/M: xx” screen
above.NOTE: Should be performed after deliming and/or
changing sprayhead. (Will not display when “BrewLogic”
is enabled)
Tracks the total number of brew cycles completed. There is one
reset-able counter, and one life counter that is not reset-able
Allows the testing of individual components and the ability to
check the membrane switches for proper function. (Diagnostic
tool for troubleshooting purposes only)
Reset ALL of the previously entered brew settings, ad mes–
sage, calibrations, etc. Factory-set default values will replace
ALL previous settings.
NOTE: Items not affected; Service #, Password, Language,
Units, Asset #, Counters and Serial Number.
ENABLE ENERGY SAVER – NO
ENABLE FRESH TIMER – NO
ENABLE WARMER OFF – NO
REFILL – 155
SPRAY 25.0 oz/M (739ml/M)
Software Version 1.07 & above
BrewLogic OFF
INITIAL FACTORY DEFAULT VALUES
Brew Lockout NO
BREW 64 OZ (2.0L)
BREW METER 1
ENABLE ADS NO
PASSWORD 0
Language English
Units English
SET TEMP 200° F (93° C)
SET READY 195° F (90° C)
ENTER ASSET # – 0
PULSE BREW – DISABLED
DRIP TIME – 0:30
ENABLE CLEAN – NO
41154 041708
Page 14
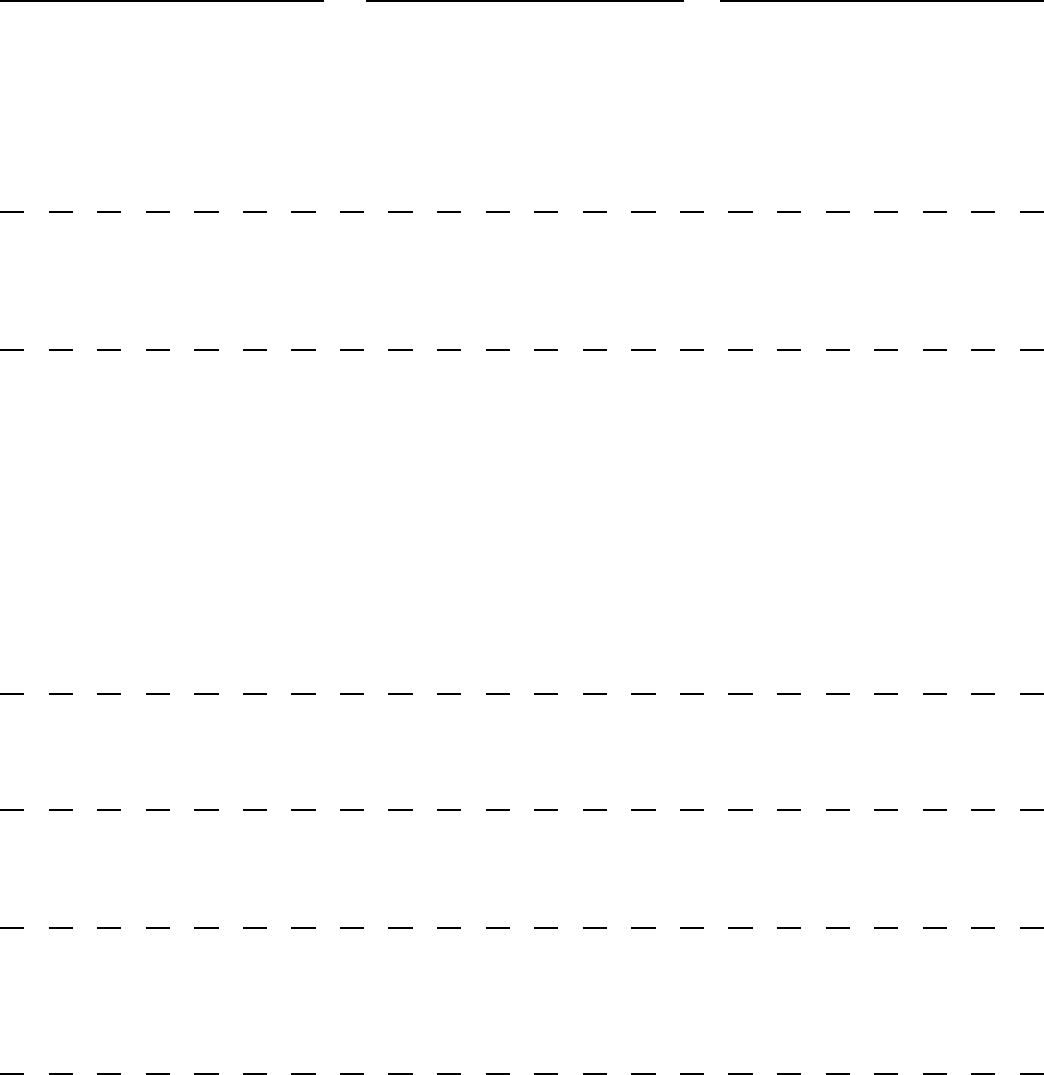
PROBABLE CAUSE REMEDYPROBLEM
TROUBLESHOOTING
Temperature Too Low
Heating Time Too Long
Fill Time Too Long
Temp Sensor Out Of Range,
Check For Bad Connections
Temp Sensor Out Of Range,
Check Wire For Shorts
Equipment will not operate
Water flows into tank continu–
ously with power removed from
brewer.
1. Water temperature in the
tank does not meet the ready
temperature.
1. Tank Heater failure.
2. Control Board/Thermistor
failure
1. Water shut off to brewer
2. Supply line too small or ob–
structed
3. Inlet Solenoid failure
4. Control Board Failure
5. ON/OFF switch is OFF
1. Temperature Sensor Probe
wire(s) broken or not making
connection
1. Temperature Sensor Probe
wire(s) shorted to housing or
to each other.
1. No power
2. Incorrect voltage
1. Refill valve
A) Wait for the brewer to heat
to the proper temperature.
B) Disable the BREW LOCK–
OUT function. Refer to program–
ming section for procedure.
Service required
Service required
Check water supply shut-off
Replace or repair as needed
Service Required
Service Required
Turn switch ON
Service required
Service required
Verify power cord is plugged
into outlet.
Service required
Service required
41154 041708
Page 15
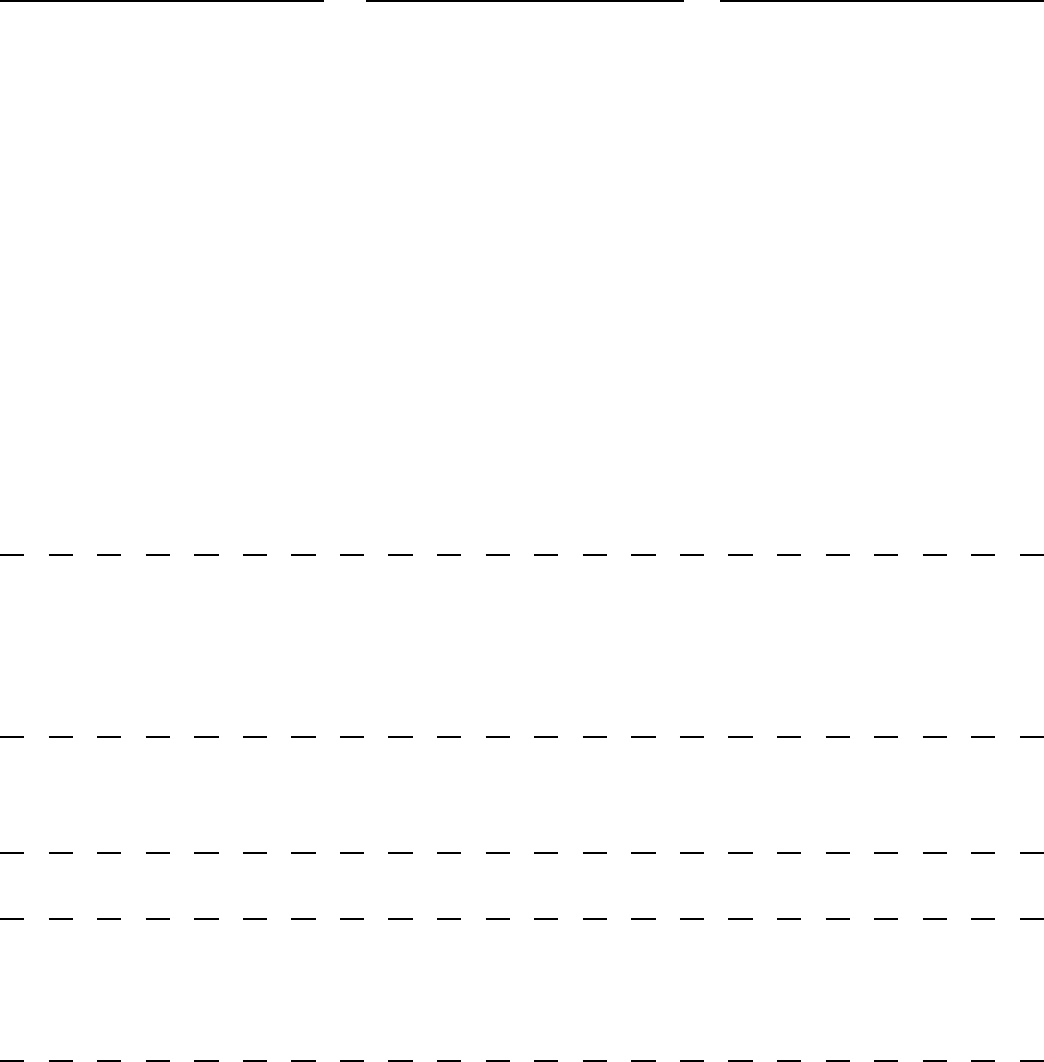
PROBABLE CAUSE REMEDYPROBLEM
TROUBLESHOOTING (cont.)
Check plumbing and shut-off
valves
A) Wait for the brewer to heat
to the proper temperature
B) Disable the BREW LOCK–
OUT function. Refer to program–
ming section for procedure.
Turn on
Service required
Service required
Service required
1. No water
2. Water temperature in the
tank does not meet the ready
temperature.
3. “ENABLE BREW ON/OFF”
switch not on.
4. Brew switch
5. Brew valve
6. Control Board
Brew cycle will not start
Spitting or unusual steaming
from sprayhead or air vent.
1. Lime buildup
2. Temperature probe
3. Control Board
Refer to cleaning section.
Service required
Service required
Inconsistent beverage level Refer to cleaning section.
Service required
1. Lime buildup
2. Brew valve
Dripping from sprayhead.
Water overflows filter.
Beverage overflows decanter
Service required
BUNN paper filters should be
used for proper extraction
Replace sprayhead
The brew cycle should be start–
ed only with an empty decanter
under the funnel.
Adjust the brew volume, cali–
brate sprayhead as required to
achieve the desired volume for
each brew cycle.
1. Brew valve
1. Type of paper filter
2. No sprayhead
1. Beverage left in decanter from
previous brew
2. Brew volume adjustment
41154 041708

Page 16
PROBABLE CAUSE REMEDYPROBLEM
TROUBLESHOOTING (cont.)
Weak beverage. BUNN paper filters should be
used for proper extraction
For coffee, a sufficient quantity
of fresh drip or regular grind
should be used for proper ex–
traction.
A BUNN sprayhead should be
used to properly wet the bed of
ground coffee in the funnel
The BUNN paper filter should
be centered in the funnel and
the bed of grounds leveled by
gently shaking.
Place empty funnel on top of an
empty server (not in the funnel
rails). NOTE: Do not remove
sprayhead!
WARNING: HOT WATER
Press brew. Check water tem–
perature immediately below the
sprayhead with a thermometer.
Recommended reading should
be at least 195°F (90°C).
Consider adjusting brew vol–
ume, and/or BREW METER.
1. Type of paper filter
2. Coffee
3. Sprayhead
4. Funnel Loading
5. Water temperature
6. Incorrect recipe
41154 041708
Page 17
PROBABLE CAUSE REMEDYPROBLEM
TROUBLESHOOTING (cont.)
Brewer is making unusual
noises.
Service required.
Plumbing lines should not be
resting on the countertop.
The brewer must be connected
to a cold water line. Water pres–
sure to the brewer must not be
higher than 90 psi (620 kPa).
Install a regulator if necessary
to lower the working pressure
to approximately 50 psi (345
kPa).
Service required.
1. Solenoids vibrating
2. Plumbing lines
3. Water supply
4. Tank heaters
“CHECK SPRAYHEAD FOR
LIME” – “CHECK FITTINGS
FOR LIME”
Refer to cleaning section.
Refer to cleaning section.
Service required.
1. Lime buildup in sprayhead
2. Lime buildup in brew valve
3. Lime buildup in brew tank
“WARNING INACCURATE
FLOW” – “TOO MUCH LIME
PLEASE REPAIR”
Refer to cleaning section.
Refer to cleaning section.
Service required.
1. Lime buildup in sprayhead
2. Lime buildup in brew valve
3. Lime buildup in brew tank
“WARNING VERY LOW FLOW”
– “PLEASE REPAIR”
Refer to cleaning section.
Refer to cleaning section.
Service required.
1. Lime buildup in sprayhead
2. Lime buildup in brew valve
3. Lime buildup in brew tank
41154 041708