
INSTRUCTIONS
ELECTRIC OIL FILLED RADIATOR
Proudly distributed by
De’Longhi Australia Pty Limited
P.O. BOX 4540
CASULA MALL NSW 2170
Customer Service Ph: 1800 126 659
Fax: 1800 706932
www.delonghi.co.au
e-mail: [email protected]
De’Longhi New Zealand Limited
25 Carbine Road
Mt Wellington
Auckland, New Zealand
P.O. Box 58-056 Botany
MANUKAU 2163
Customer Service Ph: 0508 200 300
Fax: 0508 200 301
www.delonghi.co.nz
e-mail:[email protected]
2
fig.1
fig.2
fig.3
fig.4
fig.6
fig.8
fig.9
fig.5 fig.7
Heater off
Timer operation
Manual (timer override)
3
1. GENERAL FEATURES
Remove the appliance from the packaging, turn upside
down and rest on the polystyrene.
Check that neither the appliance nor the power cable has
been damaged in any way during transportation. Do not
operate the appliance if damaged.
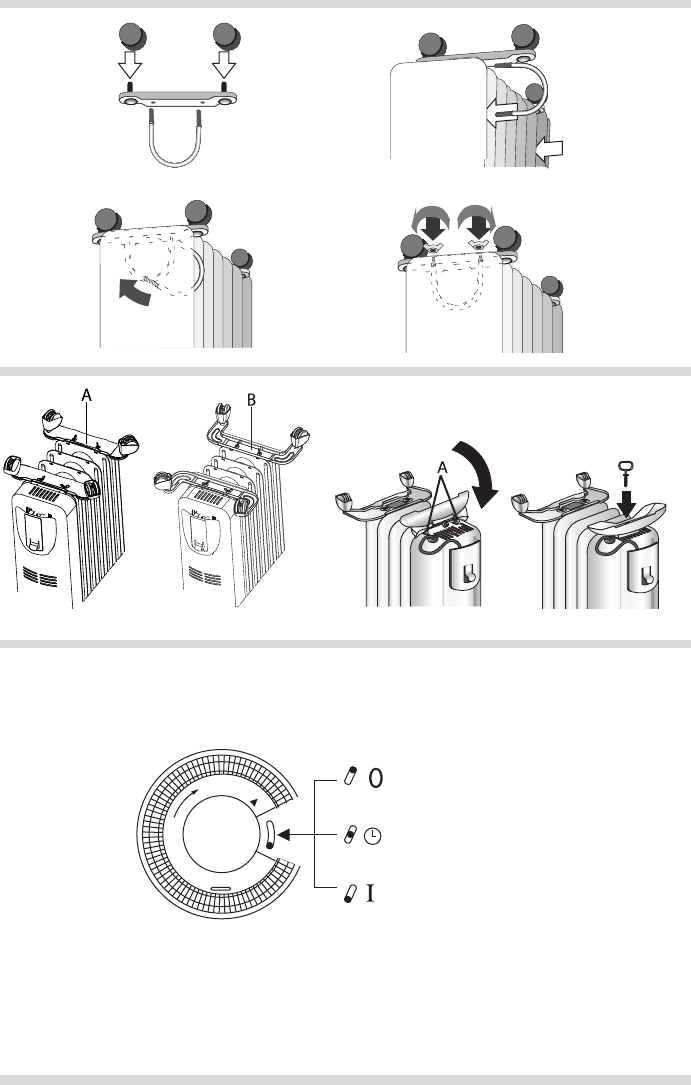
2. FITTING THE FEET
Remove the feet and the castors (if provided) from the
polystyrene packing.
Fit the castors to the spindles on the feet and push firmly
until they click into position (fig. 1).
Pull each castor to check that it is fitted correctly. In cer-
tain models, the castors are already mounted on the feet.
Using the threaded u-bolt and wing nuts, fit the feet to
the bottom of the radiator between the last two ele-
ments as shown in figures 2, 3 and 4. Depending on the
type of feet supplied, type A or B, mount the feet as
shown in figure 5 or 6.
Mount the foot without castors by inserting the two
guides (C fig. 7) into the holes on the bottom of the con-
trol box (fig. 7). Fit the tooth into the slot provided and
lock the foot with the eye screw (fig. 8).
After fitting, turn the radiator back into the vertical oper-
ating position.
3. ELECTRICAL CONNECTION
– Before plugging the radiator into the mains, check
that the voltage of your mains electricity supply cor-
responds to the value V indicated on the appliance
and that the socket and power line are appropriately
dimensioned.
– CONNECT THE RADIATOR TO EFFICIENTLY EARTHED
SOCKETS ONLY
– THIS APPLIANCE COMPLIES WITH DIRECTIVE
2004/108/EEC ON RADIO INTERFERENCE SUPPRES-
SION.
4. INSTRUCTIONS FOR USE
Switching on
Plug into the mains socket. Turn the thermostat to maxi-
mum. Switch the radiator on using the switch/switches
following the procedures given in points a) – b).
a) Models with single switch (1 power level):
– button in position «I» = Total power on (indicator
light on);
– button in position «O» = (indicator light off)
b) Models with double switch (3 power levels)
– button in position «l» = minimum power (indicator
light on);
– button in position «ll» = intermediate power (indica-
tor light on);
– both buttons in position «l» «ll» = maximum power
(indicator lights on)
To turn appliance off, switch off both switches or remove
plug from wall socket.
Adjusting the thermostat
When the room has reached the required temperature,
turn the thermostat slowly anticlockwise until the indica-
tor light goes out (or until you hear a “click”) and no fur-
ther. The set temperature will then be regulated auto-
matically and kept constant by the thermostat.
Frost protection function
With the thermostat in position and the switches
pressed, the appliance maintains the room at a tempera-
ture of about 5˚C, preventing freezing with minimum
energy consumption.
Models with 24-hour timer
U
sing the timer
If you wish to use the timer, position the switch in the
middle position (Fig. 9).
Setting the correct time
Check the time on your
watch. If for example it is
4.00 pm. (16.00), turn the
dial in a clockwise direc-
tion until the number 16
is lined up with the trian-
gular pointer (fig.10).
N.B.: Never turn the dial
in an anti-clockwise
direction!
The timer is in effect an
electric clock and works
only if the plug is connect-
ed to the power supply.
Whenever the plug is dis-
connected or there is a
power failure, the clock
must be re-set.
To program the timer
1) Set the operating
times by pushing in
the notches on the
dial corresponding
to the period
required (each notch
represents 15 mins.
fig.11)
2) Make sure that the
timer indicates the correct time (see
instructions on setting the correct
time).
*
21
2
0
1
9
16
fig.10
fig.11

3) Turn the radiatior on and set it to the heat setting
and temperature level on the thermostat as
required.
Once programmed in this way, the appliance will repeat
the pre-established program every day, if the selector is
in the position.
Timer override
If you wish to override the timer settings, push the timer
switch to position 1 (fig.9) manual (timer override). To
return to timed operation push the switch back to the
middle position (fig.9).
NOTE: if the timer switch is at the 0 position (fig.9), the
heater is off and will not operate).
TURBO HEATING
Some models are fitted with a heating fan which heats
the room more quickly.
To turn this function on, push the button into the
position.
Important: a safety device cuts in and switches off the
appliance if it overheats due to an accumulation of dust
on the air intake and output grills. To restart it, unplug
from the mains and leave the appliance to cool down.
Clean the air intake and output grills with a vacuum
cleaner, then replug into the mains and turn on again.
MODELS WITH “Tilt-switch”
Some models are fitted with a tilt-switch turns the
appliance off if it should fall over. To restart the applian-
ce, simply place it upright again.
5. MAINTENANCE
Before carrying out any operation on the radiator, unplug
from the electric mains and wait for it to cool.
The oil-filled electric radiator requires no particular main-
tenance. It is sufficient to remove the dust with a soft, dry
cloth. Never use abrasive powders or solvents. If neces-
sary remove concentrations of dirt using a vacuum clean-
er.
6. IMPORTANT
WARNING: In order to avoid overheat-
ing, never under any circumstances
cover the appliances during operation,
as this would lead to dangerous overheating.
CAUTION: In order to avoid a hazard due to inadvertent
resetting of the thermal cutout, this appliance must not
be supplied through an external switching device, such as
a timer, or connected to a circuit that is regularly
switched on and off by the utility.
The appliance is fitted with a safety device which will
switch off it in case of accidental overheating. To reset,
contact an authorised service centre.
ATTENTION: in order to avoid any danger caused by an
accidental resetting of the safety system, this appliance
must not be powered through an external timer.
– Never use the radiator near a bath, shower, basin or
swimming pool.
– Never use the radiator to dry damp garments. Never
rest the cable on hot elements.
– Use the radiator in the vertical position only.
– If the electric cable has been damaged, it must be
replaced by the manufacturer or the technical ser-
vice centre or by a qualified person so as to avoid all
risks.
– When you start the radiator for the first time, leave
it operating at maximum power for at least two
hours. During this operation, ventilate the room well
to eliminate the “new” smell emanating from the
appliance.
– It is normal for the appliance to emit a squeaking
noise when turned on for the first time.
– The appliance is not intended for use by young chil-
dren or infirm person without supervision.
– Young children should be supervised to ensure that
they do not play with the appliance.
– The appliance must never be placed immediately
under a fixed mains socket.
– This radiator is filled with a precise quantity of oil and
repairs which require it to be opened must be carried
out exclusively by the manufacturer or an authorised
service centre. In the case of oil leaks, contact the
manufacturer or the authorised service centre.
– When scrapping the appliance, respect legislation
on the disposal of oil.
– Do not use the appliance in rooms with a base area
of less than 4 m
2
.
5708014700/11.10