1
1、Introduction
Compact, rugged and easy to use. Just aim and push the button, read current surface
temperatures in less than a second. Safely measure surface temperatures of hot,
hazardous or hard-to-reach objects without contact.
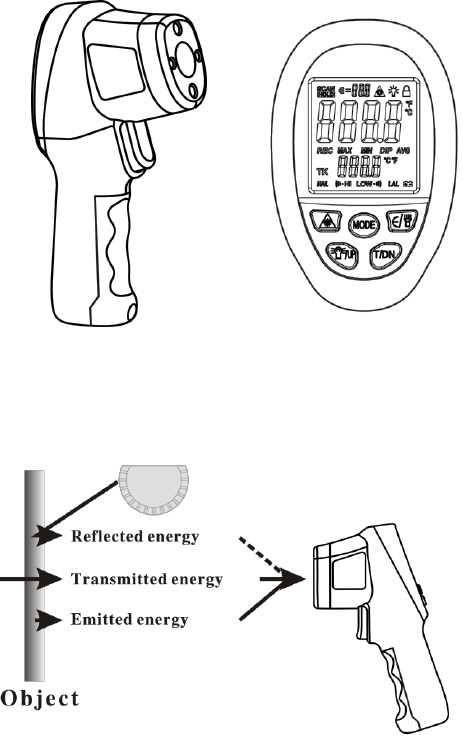
How it works
Infrared thermometer measures the surface temperature of an object. The unit’s optics
sense emitted, reflected, and transmitted energy which is collect and focused onto a
detector. The unit’s electronics transmitted energy which is display on the unit. For
increased ease and accuracy the laser pointer makes aiming even more precise.
Cautions
Infrared thermometer should be protected for the following:
—EMF(electro-magnetic fields) from arc welders, induction heaters.
—Thermal shock(cause by large or abrupt ambient temperature changes allow 1 hours
for unit to stabilize before use).
2
—Do not leave the unit on or near objects of high temperature.
Warning
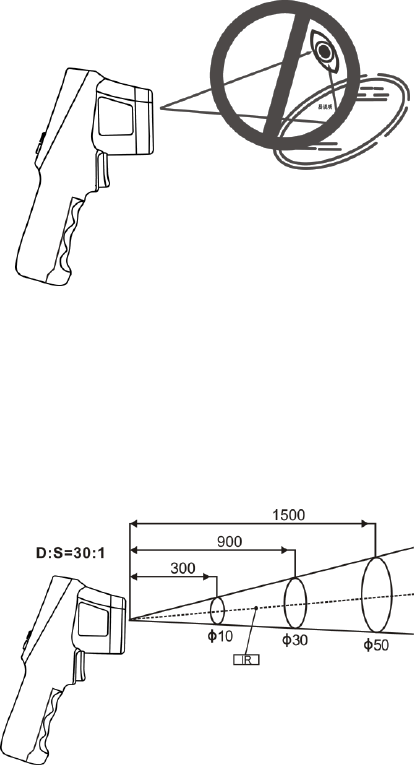
Do not point laser at eye or indirectly off reflective surfaces.
1. When take measurement, point thermometer toward the object to be measured and
hold the yellow trigger. The object under test should be large than the spot size
calculated by the field of view diagram.
2. Distance & spot size: As the distance from the object increase, the spot size of
measuring area becomes large.
3. Field of view: Make sure the target is larger than the unit’s spot size. The smaller
the target the close measure distance. When accuracy is critical, make sure the
target is at least twice as large as the spot size.
4. Emissivity: Most organic materials and painted or oxidized surfaces have an
emissivity of 0.95. Inaccurate readings will result from measuring shiny or polished
metal surfaces. To compensate, cover the surface to be measured with masking tape
or flat black paint. Measure the tape or painted surface when the tape or painted
3
reach the same temperature as the material underneath.
2、Quick start instruction
1. Remove the silica gel set, remove the battery cover screw with a screwdriver, and
then slide out the battery door, install battery correctly. And Put back to the battery
door screws and silica gel .Pull the trigger, LCD display reading & battery icon.
Release the trigger and the reading will hold for 30 seconds.
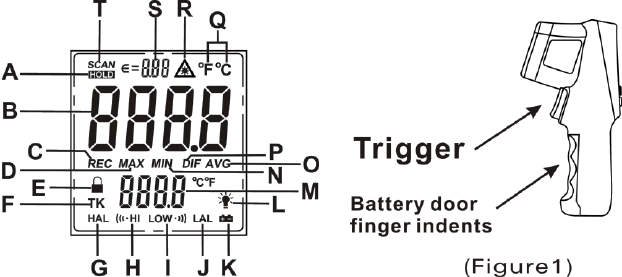
LCD display:
A Data Hold
B Main dislplay value
C Memory storage
D Maximum
E Continuous measurement
F K type temperature symbol (this unit Without this feature)
G High temperature alarm temperature
H Alarm of high temperature prompt
I Alarm of Low temperature prompt
J Low temperature alarm temperature
K Battery voltage Low
L Backlight symbol
M Additional features
N Minimum
O Average
P The maximum and the minimum difference
Q Temperature of the unit
R Laser pointer turn on prompt
S Emissivity symbol
T Measuring the symbol
4
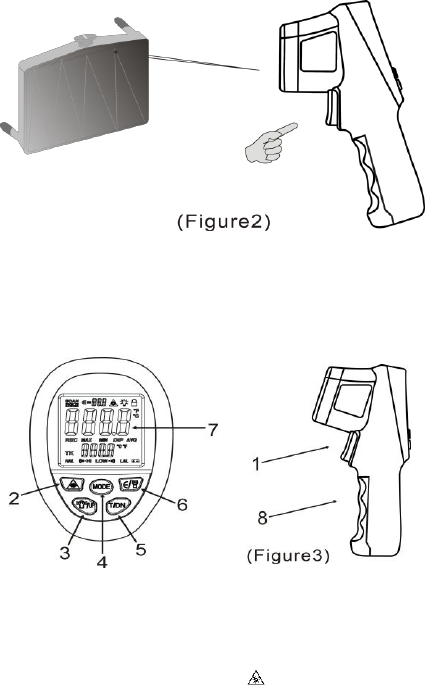
2. Locating a hot spot aim the thermometer outside the area of interest, then scan
across with up and down motions until you locate the hot spot.(please turn on the
laser to for accurate measuring)
3. Diagram description
(1) Trigger : Press for turn on, and then display test result and hold data
automatically(display HOLD) after unclamping switch. Trun off automatically after
30 seconds without operate.
(2) Laser pointer button :press it display “ ” for turn on laser pointer, press again for
turn off.
(3) Back light/UP button : When product working, press it for turn on back light,
press again for turn off. the second functian please see (4)
(4) MODE button:Press MODE button for cycle options MAX – MIN-DIF– AVG –
HAL– LAL mode.
A、MAX:Measure maximum data current;
B、MIN:Measure minimum data current;;
C、AVG:Calculate the average of all measure data;
D、HAL/LAL:HAL is Alarm of high temperature. LAL is Alarm of low
temperature. Option Alarm of temperature mode, press“Back light/UP”button for
up alarm temperature. press“T/DN”button for down alarm temperature. When LCD
5
display ” HI” means measure result exceeded the alarm temperature;When
LCD display ” LOW ” means measure result under the alarm temperature
(5) T/UP button:When product working, press direct for ℃ /
0
F select. second functian
please see (4).
(6) E/ button:When product working, press direct into set Emissivity mode, press
“Back light/UP”button for up Emissivity . press“T/DN”button for down
Emissivity. Long press the button, the head lamp lighted.
(7) LCD
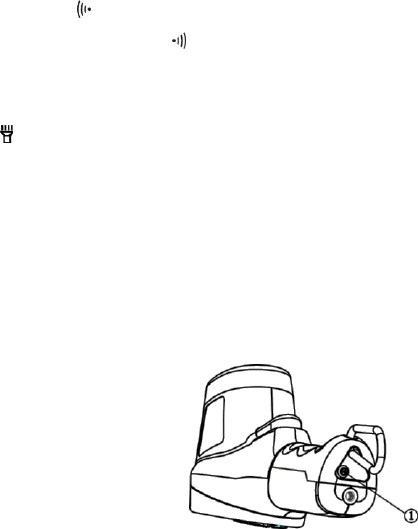
(8) Battery door: When replace battery ,take off the scrrew ,then slide open the battery
door.
The diagram below operation:
1. Use the screwdriver to unscrew the bottom screw;
2. Catch the hook and take the cover of battery out from the bottom;
3、Maintenance
1) Lens cleaning: Blow off lose particles using clean compressed air. Gently brush
remaining debris away with a moist cotton cloth.
2) Case cleaning: Clean the case with a damp sponge/cloth and mild soap.
3) Please take out the battery when not using for a long time.
Note:
1) Do not use solvent to clean lens.
2) Do not submerge the unit in water.
3) Emissivity will back to the initial value (0.95) after replacing battery,. Should adjust
again when use.

6
4、specifications
Note:
Display above code in normal Ambient temp, probable means this meter was broken.
Attached list :Applicable Emissivity for Different Material ( For reference
only )
Material
Emissivity
Material
Emissivity
Asphaltum
0.90 to 0.98
Textile(Black)
0.98
Beton
0.94
Human Skin
0.98
Cement
0.96
Soap bubble
0.75 to 0.80
Sand
0.90
Charcoal(powder)
0.96
Soil
0.92 to 0.96
Lacquer
0.80-0.95
Water
0.92 to 0.96
Lacquer (reluster)
0.97
Ice
0.96 to 0.98
Rubber(Black)
0.94
Temperature range
1500
-50℃ to 1500℃(-58 to 2732
0
F)
1420
-50℃ to 1420℃(-58 to 2588
0
F)
1320
-50℃ to 1320℃(-58 to 2408
0
F)
Accuracy
±4℃/7.2
0
F, –50℃ to 0℃(-58 to 32
0
F)
±(2% reading +2℃/3.6
0
F), 0℃ above
distance spot ratio
30:1
Emissivity
0.1~1.0 adjustable
Resolution
0.1℃(0.1
0
F)<1000, 1℃(1
0
F)>1000
Repeatability
1% of reading or 1℃
Response time
<250msec, 95%response
Spectral response
8-14um
Operating temperature
0℃ to ~40℃(32 to 104
0
F)
Storage temperature
-20~60℃(-4~140
0
F) without battery
Relative humidity
Operating :10-95%RH; Storage: 10-95%RH
Ambient temp range of
guarantee for accuracy
23℃~28℃
Weight/dimensions
160g; 192×95×63mm
Power
9V battery, 6F22 or NEDA 1604
Battery life
Laser models:12hrs

7
Snow
0.83
Plastic
0.85-0.95
Glass
0.90 to 0.95
Timber
0.90
Ceramic
0.90 to 0.94
Paper
0.70-0.94
Marble
0.94
Chromic oxide
0.81
Gypsum
0.80 to 0.90
Copper Oxide
0.78
Compo
0.89 to 0.91
Iron Oxide
0.78 to 0.82
Brick
0.93 to 0.96
Stainless steel
0.2-0.3
Above picture and content just for your reference. Please be subject to the actual
products if anything different or updated. Please pardon for not informing in
advance.

Non–contact infrared thermometer
Instruction manual
TABLE OF CONTENTS
1. Instroduction.……...……...…......….…………….…..….…..….……………...….…..….………1/3
2. Quick start instruction…………….………….……….….…………….……………….….…..….3/5
3. Maintenance….…….…..….…….…..…....…….…….………...…….…….…..….…….……….…..5
4. Specifications..….….……………….….…..….….………………...………….………….….…..….…6