Top-Loading Water Cooler
Instruction Manual
To ensure proper use and for your safety, please read the following
instructions completely before operating this appliance.
Top-Loading Dispenser with Cabinet

Congratulations, you have acquired a high–quality Hamilton Beach™ Water
Dispenser for bottled water. This product allows you to enjoy a cool drink or
a hot beverage and has many features that you will find convenient to use.
Please remember to record the model number and series code which can be
found on a label in the back of the unit.
Model number Series code Date of purchase
READ ALL INSTRUCTIONS BEFORE USING!
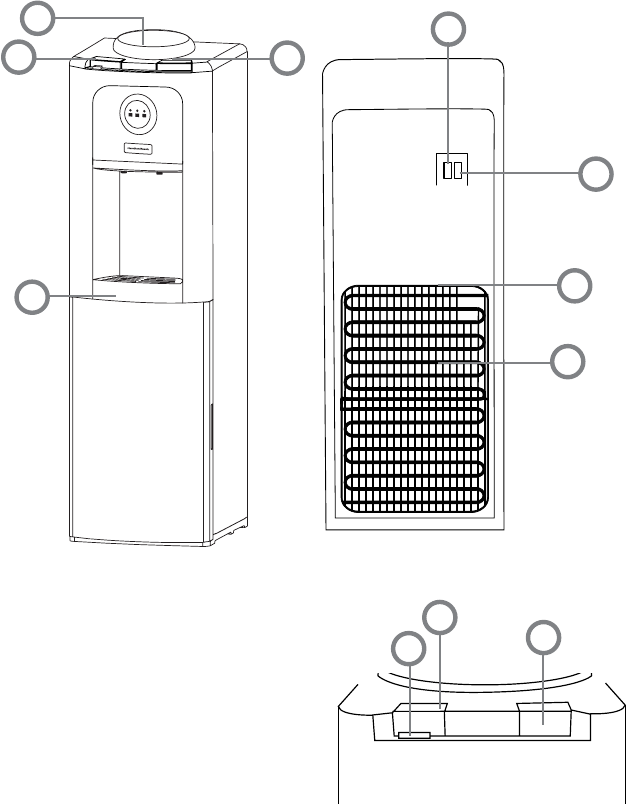
Parts and Features
2
1 Bottle support collar
2 Hot water button
3 Cold water button
4 Removable drip tray
5 Cold water switch
6 Hot water switch
7 Condenser coils
(rear of dispenser)
8 Child Safety lock
9 Stability Cable
7
4
3
2
1
6
5
2
3
8
9
IMPORTANT SAFEGUARDS
When using electrical appliances, basic safety precautions should be
followed, including the following:
• WARNING! BURN HAZARD: The product heats water to a temperature of
approximately 95° C / 203° F. Water temperatures above 52° C / 125° F can
cause severe burns or death from scalding. Children, the disabled and the
elderly are at highest risk of being scalded. Children should be supervised
by an adult when using this product.
• WARNING! FIRE HAZARD: Do not store or use gasoline or other
flammable vapors and liquids in the vicinity of this or any other appliance.
Do not operate dispenser with a damaged cord. Do not use with an
underrated extension cord.
• WARNING! SHOCK HAZARD: Unplug the water dispenser before
cleaning or wiping up spilled water on unit. Do not attempt to service the
dispenser. Do not operate dispenser with a damaged cord.
• WARNING! CRUSH HAZARD: Always attach stability cable using the
supplied directions to prevent accidental tip–over.
• Never turn the product upside down or tilt more than 45 degrees.
If the unit has been resting on its side for a long period of time, you must
position the water cooler in the upright position for approximately
12 hours before turning it on.
• Never use this dispenser with water that is unsafe to drink or is from an
unknown source.
• Never use any other liquid in this dispenser than bottled water.
• Install this water dispenser in a dry place away from direct sunlight.
For indoor use only.
• Never put anything flammable close to the dispenser.
• Leave a minimum of 2” (5 cm) around the back and sides of the dispenser
for proper ventilation.
• Regular cleaning of the water dispenser is required for proper operation
• Clean the dispenser every 4 months using the instructions in this manual.
SAVE THESE INSTRUCTIONS!
3
Grounding Instructions
WARNING! SHOCK HAZARD: Follow the following precautions:
• This appliance must be grounded. In the event of an electrical short
circuit, grounding reduces the risk of electric shock.
• This appliance is equipped with a power cord that has a grounding wire
with a grounding plug. The plug must be plugged into an outlet that is
properly installed and grounded.
• Consult a qualified electrician if the grounding instructions are not
completely understood, or if doubt exists as to whether the appliance is
properly grounded.
• Do not under any circumstances cut or remove the third (ground) prong
from the power cord.
• Do not use an adapter plug with this appliance.
• Do not use an extension cord with this appliance. If the power cord is too
short, have a qualified electrician install an outlet near the appliance.
• For best operation, plug the appliance into its own electrical outlet on a
dedicated circuit to prevent flickering of lights, blowing of fuse, or tripping
of circuit breaker.
Getting Familiar with Your Hamilton Beach
Water Dispenser
Features
• Designed for in-home or office use.
• Compact space saver design.
• Fits 3 or 5 gallon bottles.
4
Proper Installation and Location
• This dispenser is for indoor use only. Do not use outdoors.
• Place the dispenser on a level surface that can support its weight with a
full water bottle installed.
• To ensure that your water dispenser works at the maximum efficiency,
leave at least 5 cm / 2 inches of clearance between all sides of the
dispenser and any walls.
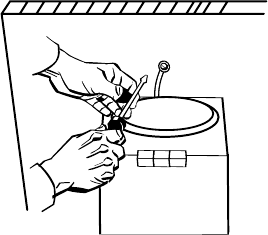
• To avoid tipping hazard, the water cooler
may be attached to the wall using the
stability cable:
1. Attach the cable to the dispenser by
clipping the plastic end to the
condenser coils on the back of the unit.
2. Fasten the other end of the cable to
the wall using the screw provided as
shown in the diagram.
• To prevent damage to the dispenser, do not plug dispenser into the power
outlet until reading the instructions first!
Preparing, Loading and Operating
Your Dispenser
1. Make sure that the dispenser is not plugged into the electrical outlet.
2. The water bottle will have a cap. The cap may have a stopper that is
intended to be pushed into the bottle. (Sometimes these stoppers are
covered by a removable paper/foil seal.) If your bottle has a cap with
a stopper, simply hold the water bottle vertically straight upside down
and place the water bottle into the support collar on top of the water
dispenser. The post in the collar will push the stopper into the bottle.
For bottles that don’t have a cap, quickly turn bottle vertically
and place into collar.
3. Plug the dispenser into the outlet.
5
Stability Cable
4. Turn on the hot and cold water switches (#5 and #6 in Parts and Features
section).
5. Allow 1 hour for water to reach hot and cold temperatures.
WARNING! BURN HAZARD: The product heats water to a temperature of
approximately 95° C / 203° F. Water temperatures above 52° C / 125° F can
cause severe burns or death from scalding. Children, the disabled and the
elderly are at highest risk of being scalded. Children should be supervised
by an adult when using this product.
6. The hot water temperature is preset to 95° C / 203° F. The
hot water spigot is equipped with a child-resistant guard that
reduces the risk of hot water being dispensed accidentally or
by small children.
7. To dispense cold water, depress the cold water button
(#3 in Parts and Features section).
8. To dispenser hot water, slide the red child safety lock (#8 in
Parts and features section) to the side, then depress the hot
water button (#2 In Parts and Features section).
9. When the water bottle is empty, vertically pull it out by two
hands, and then replace it with another bottle.
Proper Care and Cleaning of Dispenser
• To maintain maximum efficiency and to prevent bacterial growth in the
water dispenser, we strongly recommend cleaning every 4 months.
Cleaning the Outside of the Dispenser
• Wipe the outside of the dispenser with a mild soap and water mixture.
Never use harsh chemicals or abrasive cleaners. Rinse thoroughly with
clean water and dry all surfaces.
• Do not immerse the dispenser in water.
6
1
2
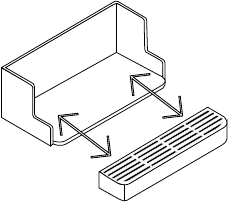
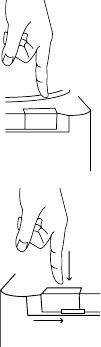
Cleaning the Drip Tray and Grill
The drip tray and grill should be emptied and cleaned regularly to remove
spotting and mineral deposits.
1. To remove the drip tray, pull the tray
forward to dislodge it from the guides.
Drain and clean.
2. Use cleaning solution or a mild soap and
water mixture. For tough deposits, add
vinegar and let soak until the deposits come
loose. Then wash, rinse and dry thoroughly.
3. To replace the drip tray, put the grill back on the
tray and slide the tray onto the guides.
NOTE: The drip tray is not dishwasher safe.
Cleaning the Condenser
To improve cooling and efficiency, vacuum or sweep away the dust from
the condenser coils on the back of the dispenser. You can purchase a brush
designed specifically for this purpose from your local appliance stores.
Sanitizing and Cleaning the Water Tanks
Important: Periodically the water dispenser tanks must be sanitized to
prevent unpleasant tastes in the water and cleaned to remove mineral
deposits that can impair flow.
1. Empty the water bottle, and then remove it from the dispenser.
2. DO NOT ADD BLEACH FIRST OR DIRECTLY TO THE DISPENSER.
Concentrated bleach may damage plastic.
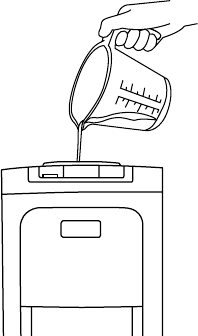
3. Add 2.5 ml / ½ teaspoon of ordinary 6.0% maximum household bleach
to a 2 liter / 2 quart pitcher filled with tap water.
4. Pour the solution in the opening at the top of the dispenser.
7
8
5. Repeat last two steps until the dispenser is full.
6. Press the hot and cold spigots until the water just
begins to flow from the faucets.
7. Allow to sit for 15 – 20 minutes.
8. Rinse out the bleach solution by pouring
approximately 4 liters / 1 gallon of fresh tap
water into the top and drain by pressing
the hot and cold taps.
9. Flush with an additional 4 liters / 1 gallon of fresh
tap water and drain by pressing the hot
and cold spigots.
10. Install a fresh water bottle (see Preparing and
Loading Your Dispenser for Use).
11. Plug in the dispenser.
12. Dispense 1 liter / 1 quart of water from each spigot and make
sure the bleach solution has been completely removed.
13. If you continue to taste the chlorine from the bleach solution,
repeat steps 8 through 12 until the taste is gone.
To Remove Mineral Deposits
To remove mineral deposits, follow the instructions for Cleaning and
Sanitizing the Water Tanks, substituting either 2 liters / 2 quarts of water
mixed with 2 liters / 2 quarts of vinegar OR 4 liters / 1 gallon of water mixed
with 454 grams / 16 ounces of citric acid crystals. Bleach does not remove
mineral deposits.

9
Troubleshooting
Problem Possible Causes Solution
No hot or
cold water.
1. Dispenser is not
plugged in.
2. Th e fu s e is b lown /circ ui t
breaker is tipped.
3. Cold/Hot Water switch is
not turned on.
4. Over consumption of
cold or hot water in a short
period of time.
1. Push plug completely into
outlet.
2a. Replace house fuse/reset
circuit breaker.
2b. If too many items are
plugged into a single circuit,
move some items to a differ–
ent circuit.
3. Turn on Cold/Hot water
switch (#5/#6 on the Parts
and Features list).
4. Wait 30 minutes before us-
ing again.
No water
running out
of spigots.
1. Empty water bottle.
2. Inlet of water bottle sup–
porter blocked by bottle
seal.
3. Mineral deposits clog–
ging tank.
1. Replace with new bottle.
2. Remove water bottle and
check inlet. Clean out waste
paper and insert bottle again.
3. See Care and Cleaning.
Water dis–
penser leaks
from the out-
side.
Crack or pin hole in water
bottle
Replace with new bottle
Water has
poor taste or
odor.
Tank needs to be cleaned
or sanitized
See “Sanitizing and Cleaning”
instructions

Hamilton Beach® is a registered trademark
of Hamilton Beach Brands used under
license by PRS Enterprises.
SAVE THESE INSTRUCTIONS!
PRS Enterprises
3349 Monroe Ave.
Suite 328
Rochester NY 14618
716–235-1300
800-256–8169
ver. 3.0
LIMITED WARRANTY
This warranty applies to products purchased and used in the U.S. and Canada. This is the only
express warranty for this product and is in lieu of any other warranty or condition.
This product is warranted to be free from defects in material and workmanship for a period of
one (1) year from the date of original purchase. During this period, your exclusive remedy is
replacement of this product or any component found to be defective at our option; however,
you are responsible for all costs associated with returning the product to us and our returning
a product or component under this warranty to you. If the product or component is no longer
available, we will replace with a similar one of equal or greater value.
This warranty does not cover glass, filters, wear from normal use, use not in conformity with
the printed directions, or damage to the product resulting from accident, alteration, abuse, or
misuse. This warranty extends only to the original consumer purchaser or gift recipient. Keep
the original sales receipt, as proof of purchase is required to make a warranty claim. This war-
ranty is void if the product is used for other than single-family household use or subjected to
any voltage and waveform other than as specified on the rating label (e.g., 120V ~ 60 Hz).
We exclude all claims for special, incidental, and consequential damages caused by breach of
express or implied warranty. All liability is limited to the amount of the purchase price. Every
implied warranty, including any statutory warranty or condition of merchantability or fitness
for a particular purpose, is disclaimed except to the extent prohibited by law, in which case
such warranty or condition is limited to the duration of this written warranty. This warranty
gives you specific legal rights. You may have other legal rights that vary depending on where
you live. Some states or provinces do not allow limitations on implied warranties or special,
incidental, or consequential damages, so the foregoing limitations may not apply to you.
To make a warranty claim, do not return this appliance to the store. Please call 1.800.256.8169
or 716.235.1300 in the U.S. Canada or visit hamiltonbeach.com in the U.S. or hamiltonbeach.
ca in Canada. For faster service, locate the model, type, and series numbers on your appli–
ance.