OWNER’S MANUAL
NUTV4
4 Channel Marine 4” UTV/ATV/BOAT
Audio System with Bluetooth

1
NUTV4
4 Channel Marine UTV/ATV/BOAT Audio System with Bluetooth
One Pair 4” 2-Way Marine Speaker:
• 4” High Quality Poly Injection Cone
• Butyl Rubber Surround
• Shinny Black Plastic Enclosure
• 1” High Temperature KEISV Voice Coil
• Fits 1.25”-2” Bars
• 1” PEI Neodymium Dome Tweeter
• 100 Watts RMS / 200 Watts Peak
• Frequency Response: 100-20KHz
• Impedance: 4 Ohms
4 Channel Marine Power Amplifier
• 4 x 100 Watts at 4 Ohms
• Anti-Thump Turn-On
• Soft Turn On/Off
• AUX Input
• Bluetooth Streaming
• Volume Gain Remote Control
• T.H.D: <0.05%
• S/N Ratio: >95dB
• Channel Separation: >65dB
• Frequency Response: 10Hz- 30kHz
• Fuse : 1 x 20A
• Bluetooth 3.0 Technology
• Bluetooth Auto Connected While Power on
• Bluetooth Auto Disconnected While Aux-in (3.5mm Connector)
• Easy and Quick Installed Handle-bar Mount Bracket is Included
• Bluetooth Console Dimension: 2.12”(W) x 1.16”(H) x 3.83”(L)
• Amplifier Dimensions: 6.3”L x 3.67”W x 2.11”H
Thank you for making your choice for marine audio entertainment!
Its compact, Marine design provides flexible mounting possibilities, and
makes it simple to expand the audio system capabilities of your vehicle.
2
Before making or breaking power connections in your system, disconnect the
vehicle
battery. Confirm that your head unit or other equipment is turned
off w
hile
connecting the input jacks and speaker terminals.
If you need to r eplace the power fuse, replace it only with a fuse identical to that
supplied with the amplifier, Using a fuse of a different type or rating may result
in damage to your audio system or your amplifier which is not co
vered by the
manufactuer’s warranty.
Installation precautions
Before you drill or cut any holes, investigate your vehicle’s layout very carefully.
Take special care when you work near the gas tank, fuel lines, hydraulic lines
and electrical wiring.
Never operate the amplifier when it is unmounted. Attach all audio system
components securely within the amplifier to prevent damage, especially in an
accident.
Do not mount this amplifier so that w
ire connections are unprotected. in a
pinched condition, in contact with any metal surfaces in your vehicle,
or likely to be damaged by nearby objects.
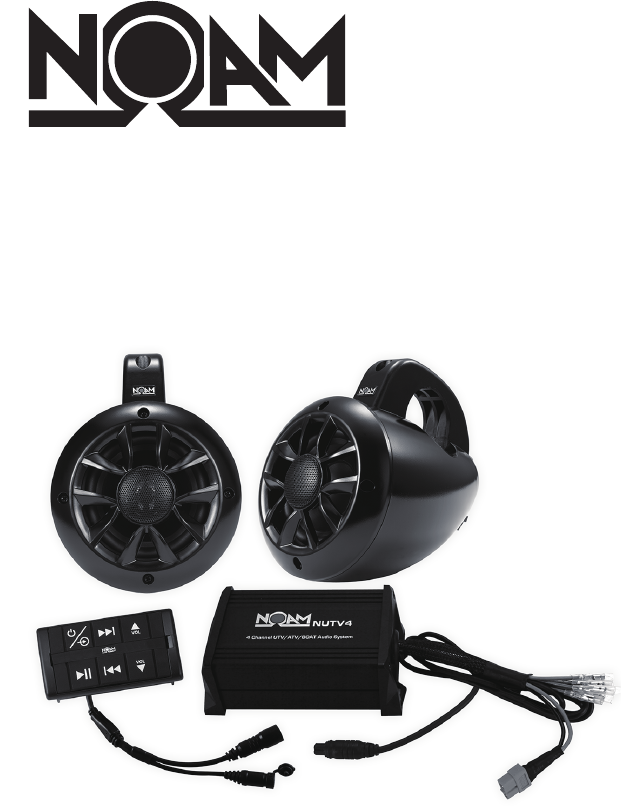
NUTV4
One Pair 4” 2 Way Marine Speaker
One Piece
One Piece
4 reifilpmArewoP eniraM lennahC
Bluetooth controller
What is included?
When first unpacking your new amplified Marine speaker system,
Please check first that the package contains all of the items below. If
something is missing, contact the store where you purchased the product.
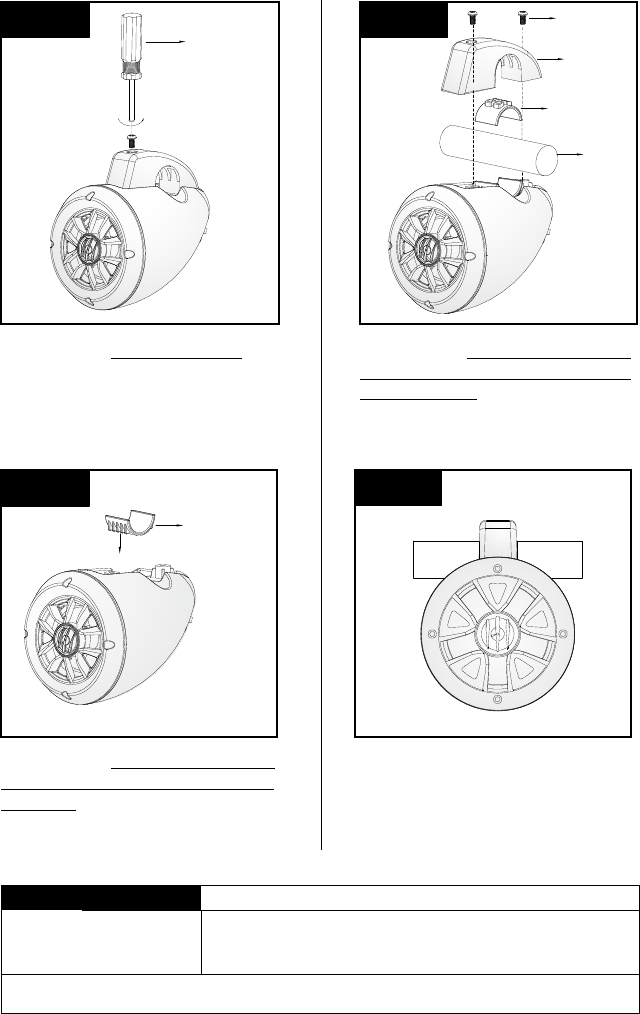
INSTALLATION INSTRUCTIONS:
3
STEP4
STEP1
Remove Both
Screws
STEP3
Screws
Mounting
Bracket
Rubber pad
Mounting
Bar
STEP2
Remove backing
From Rubber Pad
& Push Down
YOU’LL NEED: A SCREW DRIVER
YOU’LL NEED: THE RUBBER PAD TO
ADJUST THE SIZE OF THE MOUNTING
BRACKET
FINISHED INSTALLATION !!
BEGIN ENJOYING YOUR MUSIC !!
YOU’LL NEED: 2 SCREWS, MOUNTING
BRACKET, RUBBER PAD AND THE
MOUNTING BAR
Remove the two screws from the bracket
to separate the Speaker case and the
bracket.
Mount the speaker on the bar where
you want. The mounting dimension is
available from 1.25″~ 2”.
Remove the backing from the Rubber
Pad and stick on the mounting surface
Pad No.1: 76X30X2mm* 6PCS
Pad No.2: 140x30x3mm*4PCS
Pad No.3: 38x30x3mm*4PCS
2” Bar: Pad No.1* 2PCS
1.75” Bar: Pad No.1*2PCS and Pad No. 2*1PC
1.5” Bar: Pad No.1*2PCS and Pad No. 2*2PCS
1.25” Bar: Pad No.1*2PCS and Pad No. 2*3 PCS
NOTE
Rubber Pad in 3 Specification:
Rubber Pad Quantity You Need for Each Mounting Dimension:
Attention: Please Cut Pad No.2 into the Size You Need for Each Mounting Bar Size
Note: pad No.3 is an extra small pad that can be used in case you need an extra spacer for a better grip
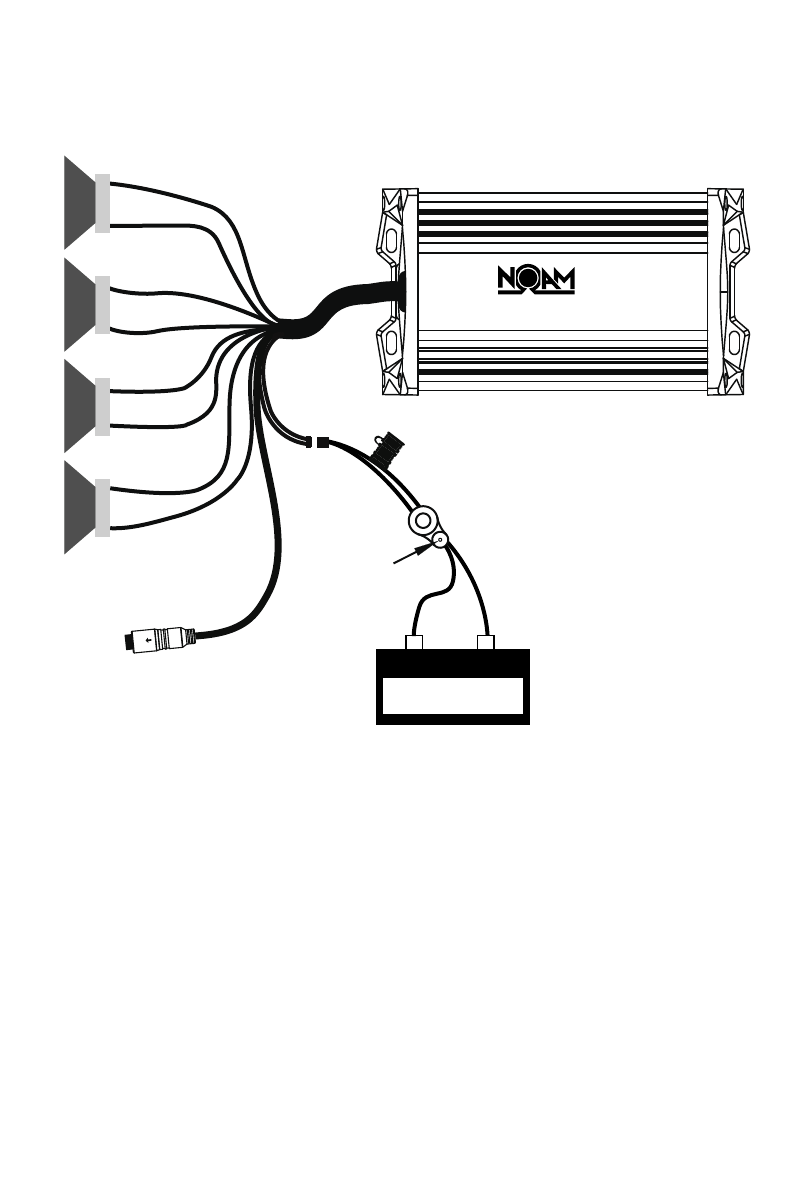
wire color
Red
Black
White
White/Black
Gray
Gray/Black
Description
Battery (+), 12dc / 12vdc = ON
Battery (-), Ground
CH1 (+)
CH1 ( – )
CH2 (+)
CH2 (-)
Green
Green/Black
Purple
Purple/Black
CH3 (+)
CH3 ( – )
CH4 (+)
CH4 (-)
Power and Speaker Wiring
4
+
–
+
–
+
–
+
–
WHITE
GRAY/BLACK
GRAY
GREEN
PURPLE
PURPLE/BLACK
GREEN/BLACK
WHITE/BLACK
NUTV4
4 Channel UTV/ATV/BOAT Audio System
BATTERY
–
+
BLACK RED
LED
Accessory
switch
Insert
4-8 ohm speakers
Connect to the
Remote Control
5
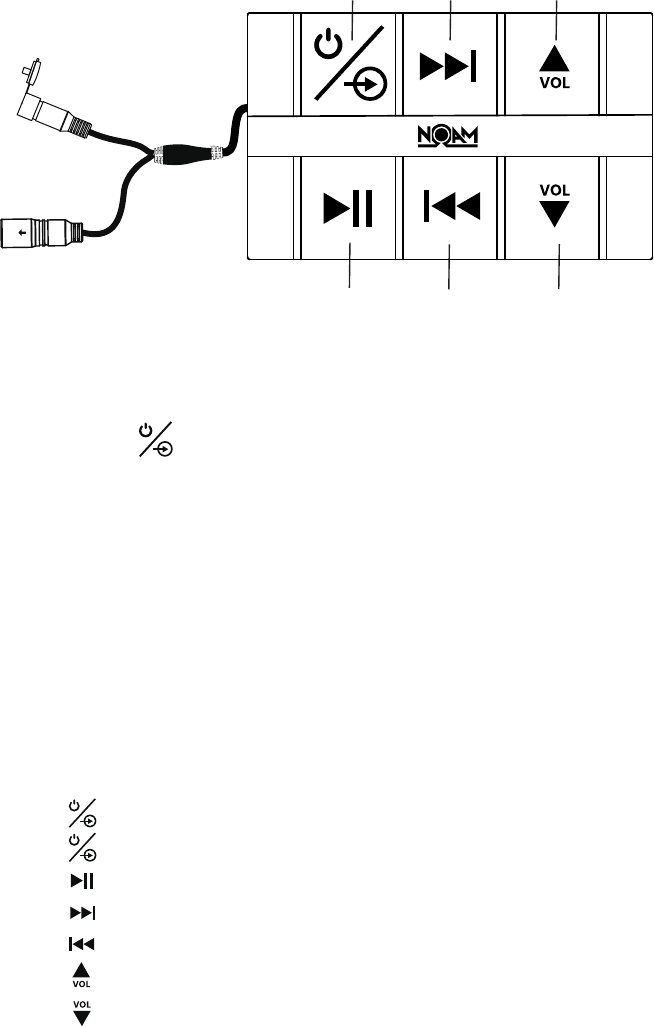
3.
4.
Press shortly for Previous track
5.
6.
Press to start or pause the music
1.
and hold for three seconds to turn On/OFF
Press
shortly in order to control the red background lightPress
2.
Press shortly for next track
7. Press shortly for volume down
Press shortly for volume up
Playing Music:
4.
5.
lights (red)
1.
2.
Press and Hold
3.
When Bluetooth is disconnected or the 3.5mm AUX Input is
plugged in, the power indicator will glow red.
Bluetooth Pairing and Connection:
Connect Bluetooth controller box to your device
for three seconds until power indicator
The system will automatically go into pairing mode
The power indicator will turn red for about 4-6 seconds and then
alternating red and blue (Bluetooth blue Power red)
Please be sure that Bluetooth is turned ON. Select NOAM Audio
on your device to connect Bluetooth controller (if the Bluetooth
controller is connected the light will turn blue and not flash)
When the device is out of Bluetooth range, Bluetooth will be
disconnected automatically and automatically reconnect when
detected in range again. (If not please just repeat steps 2 and 3)
Play / Pause
Previous
Song
Volume Down
Next Song
On/Off &
Background Light Volume Up
AUX Input
Connect to the Amplifier
66
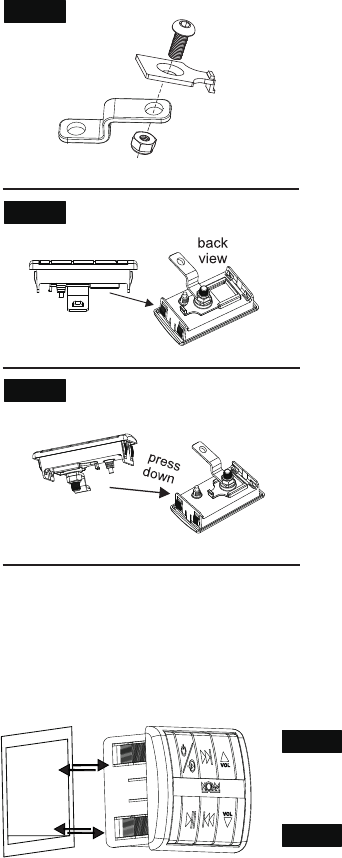
Bluetooth Installation
(MODE 1“Surface mount”)
1. Install
“Z” shaped bracket threaded
on to the Bluetooth controller hook.
(packed with Bluetooth controller.)
2. Slide the Bluetooth controller into
the hook
3. Press down the Bluetooth controller
hook and then slide out the Bluetooth
controller box at the same time to
remove the Bluetooth controller
STEP1
STEP2
STEP3
Bluetooth Installation
(MODE 2“Push-Fixed in Mount”)
STEP1
STEP2
Decide the place for Bluetooth remote
installation. Draw and cut the size into
85 x 49mm ( L x W)
Push in the Bluetooth remote
Use the hole on the other bracket’s end
to mount the controller. any screw/bolt
and a washer will allow a clean and easy
surface mounting.