
If you can’t connect to your wireless Beats
product
Share via Email(opens in new window)
Share via link(opens in new window)
Print
Here’s how to troubleshoot the Bluetooth connection between your Beats product and your
iPhone, iPad, iPod touch, Mac, or other device.
1.
Check the location
Place your Beats product and your paired device within 30 feet of each other. Move both
devices away from other Bluetooth devices, microwaves, wireless routers, and other
electronics.
2.
Check the sound settings
On your iOS device, go to Settings > Bluetooth and select your Beats.
On your Mac, choose Apple ( ) menu > System Preferences, click Sound, then select
your Beats product in the Output and Input panes.
On your PC, go to the sound settings and select your Beats as the playback/recording
device.
3.
Check the volume
1. Make sure that both your Beats product and your Bluetooth device are charged
and turned on.
2. Play a track that you downloaded to your device, not streaming audio.
3. Increase the volume on your Beats product and on the paired Bluetooth device.

4.
Use Forget Device, then pair your Beats again
1. Disconnect your Beats product.
On your iOS device, go to Settings > Bluetooth, tap the i next to the name
of your Beats product, then tap Forget This Device.
On your Mac, choose Apple ( ) menu > System Preferences, click
Bluetooth, select your Beats product, click the X, then choose Forget
Device.
2. Pair your Beats product again.
5.
Reset your Beats product, then pair them again
Reset your headphones, reset your earphones, or reset your speakers. Then pair your
Beats product with your device again.
6.
Pair your Beats product
Follow the pairing instructions for your Beats product:
o Studio
3
Wireless
o Solo
3
Wireless
o Beats
x
o Pill
+
o Powerbeats
3
Wireless
o Beatbox Portable
o Pill 1.0, Pill 2.0
o Powerbeats
2
Wireless
o Studio Wireless
o Wireless
Update the firmware of your Beats product

Share via Email(opens in new window)
Share via link(opens in new window)
Print
Use Beats Updater to keep your Beats wireless headphones, earphones, and speakers up to date
with the latest firmware.
1.
Install Beats Updater
If you meet the following system requirements, download Beats Updater, then double-
click the downloaded file and follow the onscreen instructions.
o Pill 2.0, Beats Pill
+
, Powerbeats
2
Wireless, Powerbeats
3
Wireless,
Studio Wireless, Studio
3
Wireless, Solo
2
Wireless, Solo
3
Wireless, or Beats
x
o A recent version of Apple Safari, Google Chrome, Mozilla Firefox, or Microsoft
Internet Explorer
o macOS Sierra 10.12 or later; or Windows 7 or later
2.
Plug into USB port
Plug your Beats product directly into the USB port of your computer using the
appropriate cable:
o Beats Pill
+
and Beats
x
: Lightning-to-USB cable
o Other Beats products: micro-USB-to-USB cable that supports data transfer
3.
Check for firmware updates
Click the Beats status icon in your menu bar, then click the name of your product to go to
the Beats Updater website.
If a firmware update is available, and your battery is at least 20% charged, you’ll see an
Update button in your browser window.

4.
Update your firmware
Click Update, then follow the onscreen instructions.
5.
If Beats Updater doesn’t see your device or complete the update
o Make sure that the USB cable is securely connected to your computer and Beats
product.
o Use another USB port on your computer. Don’t use a USB hub.
o Turn off your Beats product, then turn it back on.
o Reset your Beats product.
o Reset your computer.
Set up and use your Studio
3
Wireless
headphones
Share via Email(opens in new window)
Share via link(opens in new window)
Print
Learn how to connect, charge, and use your Studio
3
Wireless headphones with your devices.
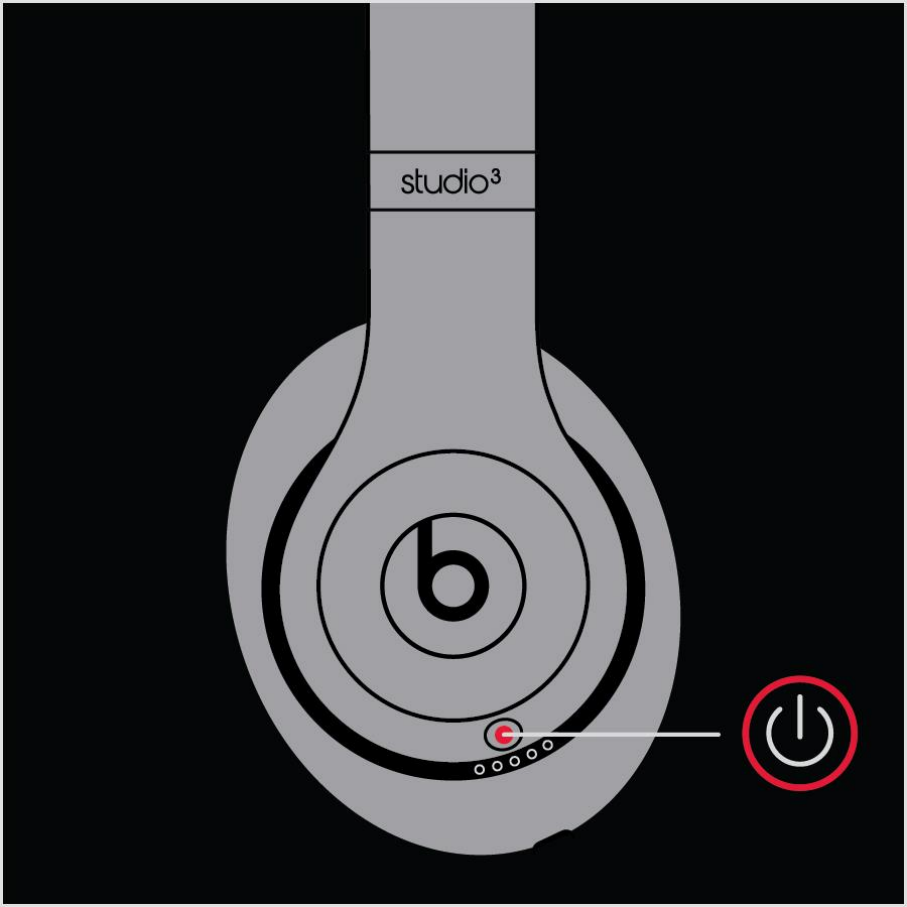
1.
Turn your headphones on or off
Press and hold the power button for 1 second.
2.
Pair your headphones
If you turn your headphones on and the indicator light turns on but doesn’t flash, your
headphones are already paired with a device. In that case, follow the steps to connect to a
different device.
Pair with an iPhone that uses iOS 11 or later
1. On your iPhone, go to Settings > Bluetooth and make sure that Bluetooth is
turned on.
2. Press the power button on your headphones for 1 second.
3. Hold your headphones within 2 inches of your unlocked iPhone. After a few
seconds, your iPhone asks you to connect.
4. Follow the instructions on your iPhone.
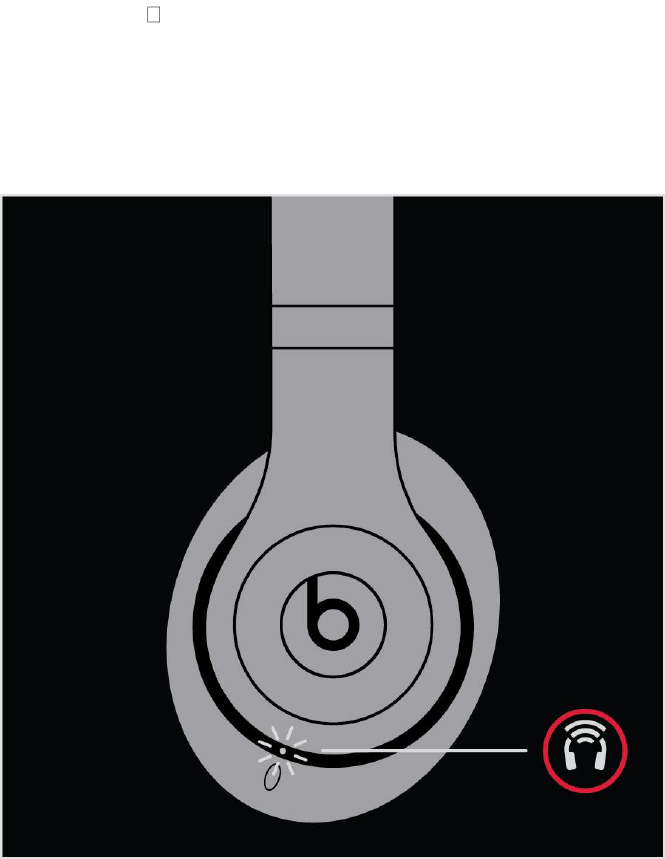
Pair with your Mac or another device that uses Bluetooth
5. Press the power button on your headphones for 5 seconds. When the five Fuel
Gauge lights flash, your headphones are discoverable.
6. Go to the Bluetooth settings on your device. For example, on your Mac, choose
Apple ( ) menu > System Preferences, then click Bluetooth. Make sure that
Bluetooth is turned on.
7. Select your headphones from the list of discovered Bluetooth devices.
Your headphones automatically pair with your other devices that are signed in to iCloud
and using iOS 11 or later, macOS Sierra or later, or watchOS 3 or later.
3.
Connect to a different Apple device
Your headphones automatically reconnect to the last device you used with them. To
connect to another device, follow these steps.
Connect your headphones to your iPhone, iPad, or iPod touch
1. Go to Settings > Bluetooth.
2. Tap the name of your headphones in the list.
Connect to other devices
3. Go to the Bluetooth settings on your device. For example, on your Mac, click the
Bluetooth icon in the menu bar.
4. Select your headphones from the list of Bluetooth devices. If you don’t see your
headphones in the list, press and hold the power button on your headphones for 5
seconds.
4.
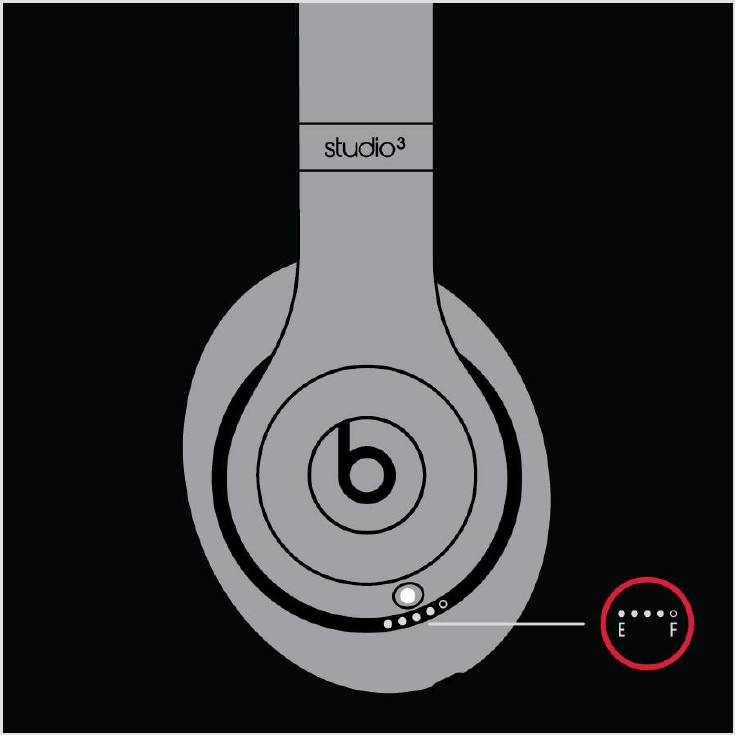
Charge your headphones
Plug your headphones into a power source using the included micro USB cable. As the
headphones charge, the five Fuel Gauge lights flash. When your headphones are fully
charged, all five lights remain lit.
Your headphones provide up to 22 hours of playback from 90 minutes of charging, and
up to 40 hours when you turn off Pure ANC. And with Fast Fuel, your headphones
provide up to 3 hours of playback from a 10-minute charge.
5.
Check how much charge your headphones have
To check the battery level, make sure your headphones are turned on, then tap the power
button on your headphones and watch the five Fuel Gauge lights on the right earcup.
6.
Use your headphones
Learn how to play music, change the volume, use Siri, answer calls, and cancel noise.
Play
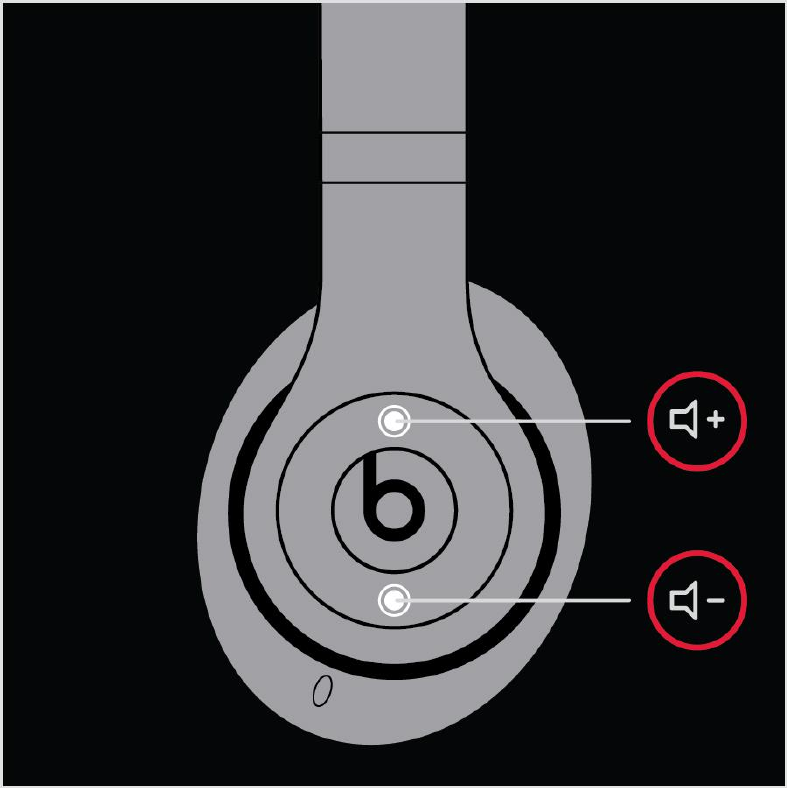
Use the b button on the left earcup, or use the center button on the RemoteTalk cable in
wired mode.
o To pause or play a track, press once.
o To skip to the next track, press twice. To skip backward, press three times.
o To scan forward through a track, press twice and hold on the second press. To
scan backward through a track, press three times and hold on the third press.
Change the volume
To control the playback volume or call volume, use the volume buttons above and below
the b button on the left earcup. Or you can use the volume buttons on the RemoteTalk
cable.
7.
Answer calls
Use the b button on the left earcup, or use the center button on the RemoteTalk cable.
o To answer or end a call, press once.
o To answer a second incoming call and put the first call on hold, press once. When
two calls are active, this switches between calls.
o To reject an incoming call, press and hold for 1 second.
o To stop listening through your headphones and send the call to the phone, press
twice.
Ask Siri
To activate Siri on your iOS device or the voice-command feature on another device, use
the b button on the left earcup or use the center button on the RemoteTalk cable. Press
and hold until you hear a chime, then say what you need.
Siri features might vary by country or region.
Turn Pure ANC on or off
Pure ANC turns on each time you turn on your Beats Studio
3
Wireless, reducing external
noise during playback. To turn Pure ANC on or off, double-press the power button while
your headphones are connected to your device.
8.
Update
If you pair your headphones with an iPhone that uses iOS 11 or later, your headphones
automatically update to the latest firmware.
If your headphones aren’t paired with an iPhone that uses iOS 11 or later, you can use the
Beats firmware updater.